July 19, 2014 – Tomato Scallion Shortcakes with Whipped Goat Cheese

20140719_Shortcakes with Whipped Goat Cheese_IMG_8325_edited-1

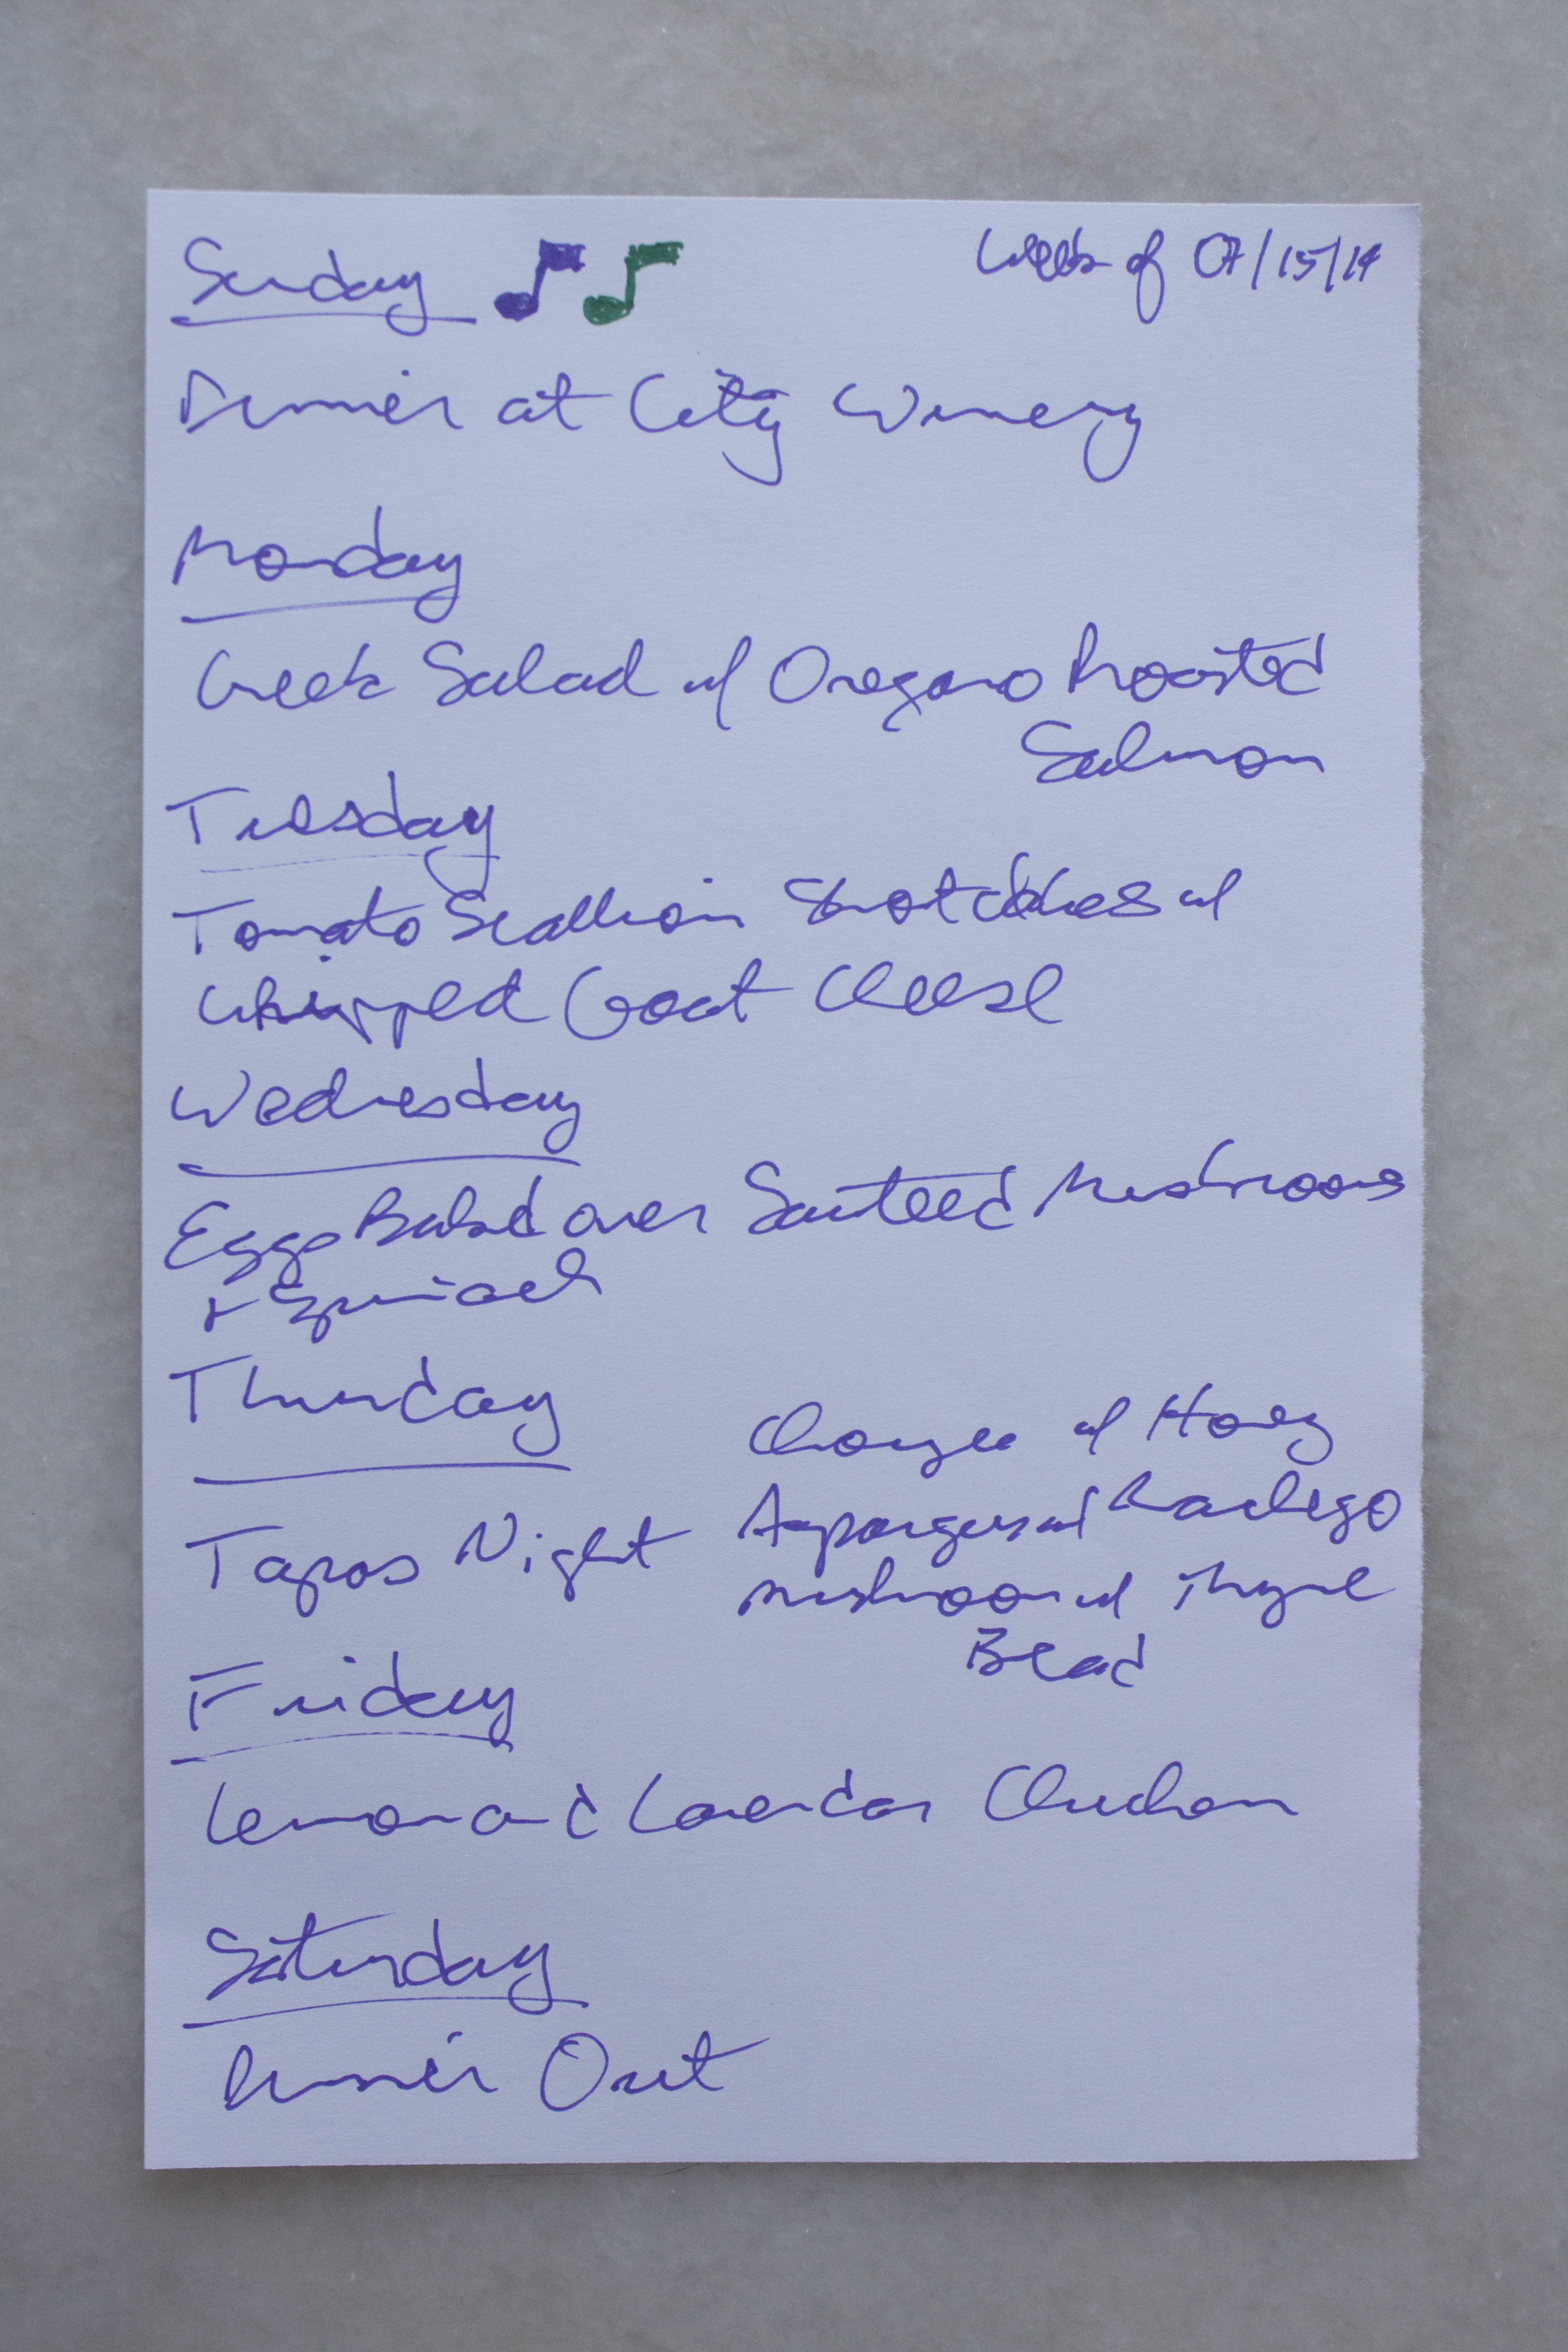
With tomatoes in season, it seemed like the perfect time to try Tomato Scallion Shortcakes with Whipped Goat Cheese – and we were right. We had planned to make this dish on Tuesday night, but life got a little hectic so it got pushed to the weekend, where it made for an enjoyable Saturday lunch at home. Here’s how it went when Kim made it:

I started by making the whipped goat cheese, which very easily came together with very little attention from me because I used our stand mixer. (Given the size of our kitchen, the mixer is always accessible since it sits out on our counter.)

20140719_Shortcakes with Whipped Goat Cheese_IMG_8305_edited-1

On Sunday, I had measured out all the dry ingredients, cubed the butter, and sliced the scallion for the shortcakes. This was going to save me a little time Tuesday night, when we were originally going to make the shortcakes, so I was able to jump right into making them on Saturday. I used a pastry blender (my first time) to cut in the butter and I was surprised how easy (and efficient) it was to get the flour mixture to the desired texture of coarse meal. I add the milk and it really started to look like shortcake dough!

20140719_Shortcakes with Whipped Goat Cheese_IMG_8302_edited-1

It was easy to shape the dough to the desired thickness of about an inch. I found that dipping my biscuit cutter into a little flour made it very easy to cut the shortcakes out of the dough and drop them onto the parchment lined baking sheet. I only had to reshape the dough once and was able to get six shortcakes out of it.

20140719_Shortcakes with Whipped Goat Cheese_IMG_8308_edited-1

While the shortcakes were in the oven, I made the tomato salad, which was very colorful and summery-looking and only took a few minutes. I very much agreed with the step of rotating the shortcakes mid-way through baking, but be careful—mine really slid around on the parchment paper and I almost lost one! I used the rest of the baking time to clean up the kitchen and start to think about plating.

20140719_Shortcakes with Whipped Goat Cheese_IMG_8317_edited-1

20140719_Shortcakes with Whipped Goat Cheese_IMG_8309_edited-1

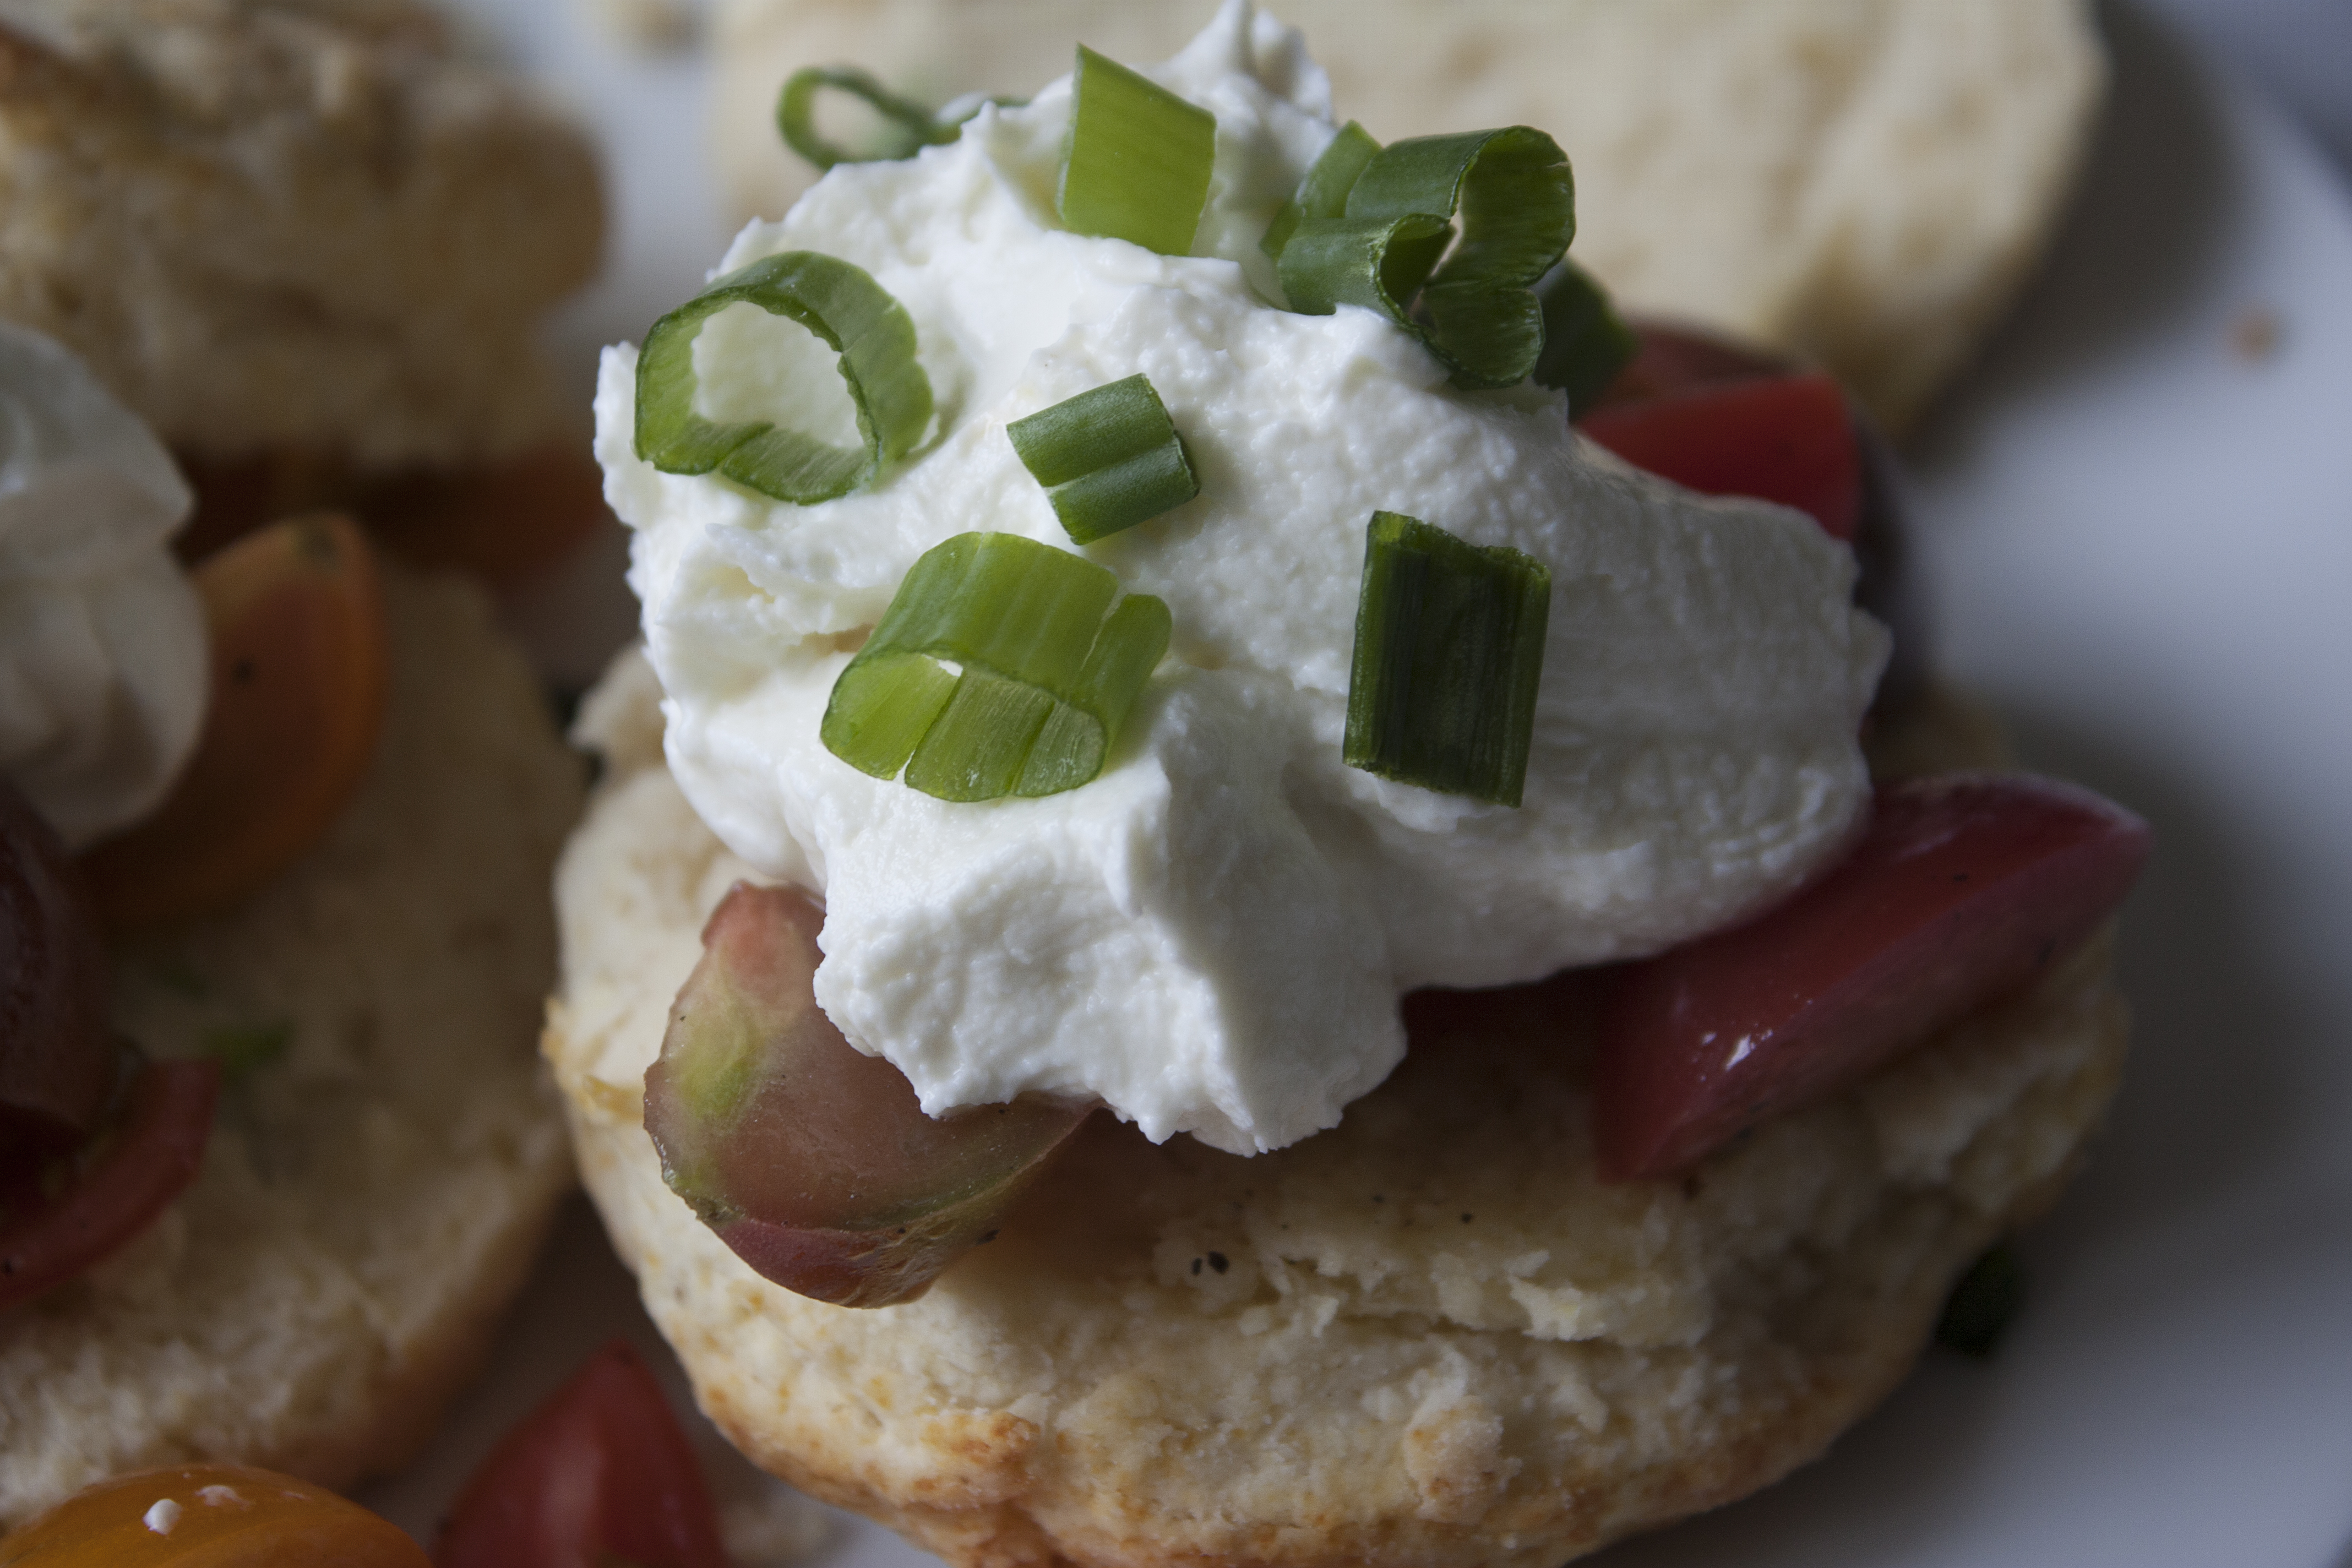
We plated two shortcakes each as we didn’t have much for breakfast. We split them in half, added a dollop of whipped goat cheese and a few big spoonfuls of tomato salad, and had a delicious and filling lunch, which we paired with a small glass of white wine left over from earlier in the week. We had a couple of biscuits and a little goat cheese left over, which made for a nice, light brunch the next day.

I think with the approach of measuring out the items for the biscuits and perhaps making the whipped goat cheese in advance, this could definitely work as a weeknight meal.

20140719_Shortcakes with Whipped Goat Cheese_IMG_8320_edited-1

Posted in Uncategorized | 1 Comment

July 18, 2014 – Lemon Lavender Chicken

20140718_Lemon Lavendar Chicken_IMG_8277_edited-1

Lemon Lavender Chicken is a delicious dish from Rachel Khoo’s Little Paris Kitchen (page 184; and adaptation can be found here) that has become one of our favorites. It’s simple, flavorful and delightful enough for a romantic evening at home or for company.  Kim tells us how it went on Friday night.

I started by baking a loaf of par baked French bread and while that was in the oven I made the marinade.  I highly recommend serving bread with the chicken—you will want it to sop up every drop of the delicious sauce.

I planned to halve the recipe but the package of chicken legs and thighs I purchased had six small pieces (I was expecting four or five), so I decided to make the entire marinade. Having made this recipe before, I knew extra sauce would not be an issue.

20140718_Lemon Lavendar Chicken_IMG_8261_edited-1

The first time I made this, I didn’t have time to find lavender so I substituted herbs de Provence (the version I have contains lavender, but not all versions do) and the result was exceptional, especially since I did have lavender honey. Herbs de Provence have been my go to substitution every time I’ve made this.

The marinade comes together quickly and smells wonderful. I patted the chicken pieces dry, placed them in a zip top bag and poured the marinade over.  I used part of the 30 minutes that the chicken was marinating to pull together a salad of baby romaine and a little fresh parsley with a light dressing of olive oil, grainy Dijon mustard, white wine vinegar, and salt and pepper.

After the 30 minutes elapsed, I poured the chicken and marinade into the Dutch oven and put into the oven. As the recipe suggested, I turned the chicken pieces over halfway through. As the chicken cooked, the whole apartment was filled with the delicious sweet smell of the lemon, honey, and herbs.

20140718_Lemon Lavendar Chicken_IMG_8271_edited-1

The chicken was perfectly cooked after 45 minutes and paired nicely with the crisp green salad—and of course the bread to make sure we got to enjoy all of the sauce.  We had a split of Veuve Clicquot (a gift from my friend Rachel at work in honor of my recent promotion—thank you, Rachel!) and it was the perfect pairing.

Lemon and Lavender Chicken may sound unusual at first, but after one bite, I think this will become a favorite of yours as well. Next time I make it, I’m going to try it with lavender instead of herbs de Provence. I have a feeling the results will be just as incredible.

20140718_Lemon Lavendar Chicken_IMG_8282_edited-1

Posted in Uncategorized | 2 Comments

Special Feature: Union Square Cafe Bar Nuts

20140718_Union Square Bar Nuts_IMG_8267_edited-1

One our favorite snacks with a cocktail is Union Square Café Bar Nuts. They are a wonderful mix of slightly sweet and salty combined with a little heat from the cayenne in the recipe and the piney flavor of the rosemary. These nuts are impressive enough for company, yet casual enough for drinking a beer and watching a baseball game on TV.

In the past, I’ve followed the recipe exactly and used all the varieties of nuts suggested – peanuts, cashews, brazil nuts, hazelnuts, walnuts, and almonds. But in a pinch, like this time around, I had only almonds, hazelnuts and pecans and they were just as delicious, with the hazelnuts being the real standout. I made half the recipe, which is way too much for two people, but they do last for a few days. That is if you can resist eating them!

Posted in Uncategorized | Leave a comment

July 16, 2014 – Eggs Baked Over Sautéed Mushrooms and Spinach

20140716_Eggs Baked Over Mushrooms & Spinach_IMG_8251_edited-1

Tonight we made Eggs Baked Over Sautéed Mushrooms and Spinach. Here, Tony describes how he made this very simple dish

This is probably one of the easiest recipes we make in terms of prep as there are very few ingredients and I didn’t need to do too much with them. I sliced up the mushrooms as thinly as I could and then turned my attention to the leek. A leek, as you can see in the photo below, looks kind of like a giant scallion. I cut off the bulb end of the leek as well as most of the dark green part. I then rinsed it under running water to get the remaining dirt our and split it in half lengthwise. I saved one half (the full recipe calls for one whole leek for four servings, but we were only making two servins) and sliced the remaining half into ½ inch pieces.

20140716_Eggs Baked Over Mushrooms & Spinach_IMG_8246_edited-1

Cooking for this recipe is also very easy. I sautéed the leeks in our Dutch oven for few minutes and then added the mushrooms. I covered the pot and let the mushroom cook down, stirring every few minutes or so. I then added the liquid ingredients (soy sauce and red wine) and cooked everything a little longer, finally adding the spinach and cooking that just until it wilted.

20140716_Eggs Baked Over Mushrooms & Spinach_IMG_8249_edited-1

I divided the mixture evenly between two oiled cocottes (little dishes with high sides) and cracked an egg on top of each pile of veggies. The cocottes went into the oven for the full twelve minutes and when they came out the eggs were exactly as they were supposed to be: whites just set, yolks still runny. (You can of course cook the eggs longer if you like). In retrospect, I should have probably used two eggs per cocotte, but one egg made for a relatively light dinner, which was nice too. We had the eggs with some wheat toast and a white Bordeaux (Château Haut Rian Bordeaux Blanc) for a fast but elegant weeknight dinner.

Posted in Uncategorized | Leave a comment

July 14, 2014 – Greek Salad with Oregano-Roasted Salmon

20140714_ Greek Oregano-Roasted Salmon_IMG_8241_edited-1

Tonight we made Greek Salad with Oregano-Roasted Salmon, a delicious dish that is perfect for summertime, since it involves very little actual cooking. Tony describes making this fun dinner.

I prepped the salmon as the recipe directed (rub with olive oil, seasons with salt and pepper). As usual we were halving the recipe so we used two, roughly 6 ounce pieces rather than one 1 1/4 pound piece. The recipe also says to set a rack over a baking sheet, arrange the oregano sprigs in the center of the rack, and lay the salmon on the oregano, so I did that to, as you can (sort of) see in the photo below. I wasn’t ready to put the salmon in the over just yet, so I started on the salad and dressing.

20140714_ Greek Oregano-Roasted Salmon_IMG_8230_edited-1

Like the salmon, the salad is very easy to prep. We were using a package of baby romaine lettuce, so I just pulled out a few handfuls and then cut up the cucumber and onion. (I forgot about the tomatoes. This was bad. Do not forget about the tomatoes). This all took maybe 10 minutes, as did making the dressing, which is part of what makes this recipe great – minimal prep, minimal time with the oven on.

Once the salad and the dressing were ready, I put the salmon in the oven. We tend to like our salmon closer to the rare end of the spectrum than the well-done end and since it was going into a 450 degree oven, I erred on the side of caution. In fact, I erred way on the side of caution and only left the fish in the oven for 10 minutes, rather than the 12 minutes the recipe suggests as a minimum. The fish looked fine when it came out of the oven (as you can see below), but was a little underdone in the middle. This wasn’t a big issue for us – like I said, we like our salmon closer to rare, but I next time I’ll aim for 12 minutes!

20140714_ Greek Oregano-Roasted Salmon_IMG_8235_edited-1

This dish is intensely flavorful as the dressing and olives and feta really pack a (tasty) punch, but don’t overwhelm either the salmon or the salad. We paired this with up with an Italian white wine (San Quirico Vernaccia di San Gimignano), which was perfect match, and we enjoyed a lovely dinner.

Posted in Uncategorized | Leave a comment

Special Feature: Savory Cake

20140706_Pistacchio Prune Cake_IMG_8053_edited-1

Since we had dinner out last night, we thought we would share a recipe from last week that we (and our friends!) enjoyed very much! Kim tells the story of the savory cake:

I had wanted to make Rachel’s Khoo’s Cheese, Pistachio and Prune Cake for a very long time after seeing it on her show, The Little Paris Kitchen, and reading the variation in her cookbook of the same name. She had noted it was perfect for a picnic and I was just waiting for the right opportunity.

When our friends Alexandra and Eric invited us for an evening with their friends at the Honorable William Wall (the floating clubhouse of Manhattan Sailing Club) the idea of bringing the savory cake seemed perfect. And it was.

I made the cake on Sunday afternoon and the directions were very easy to follow even though I forgot to chop the pistachios as she suggested. (It turned out, it didn’t matter.) Mine needed the full recommended time to bake and truly smelled wonderful. It was hard to wait to try it until Tuesday but into the fridge it went. (I kept it in the loaf pan.)

Monday night I took the cake out to slice it as I thought it would be easier to do that at home than at work. Since the recipe recommends lining the baking tin with parchment paper, the cake came out of the loaf pan very easily. I sliced the cake and really was able to see how beautiful it looked with the white of the goat cheese, the darkness of the prunes and the pop of green from the pistachios sprinkled throughout.

20140706_Pistacchio Prune Cake_IMG_8118_edited-1

I put the cake back into the fridge wrapped in the original parchment paper and aluminum foil and then placed it into a zip top plastic bag. The next day, the cake’s adventures really began!

It spent the day in the refrigerator at work and it emerged unscathed as I was thankfully able to find a nice secure spot on the door as the main part tends to be overcrowded. Before I left work, I retrieved the cake, put into my tote bag, and headed to the subway, on what was very hot evening.

Of course, the subway was very crowded and I was certain the cake was getting squished at every stop along the way to lower Manhattan. I had met up with Tony at his subway stop and we were both relieved to be done with our underground adventure. We then headed to the (crowded, of course) boat launch that takes you to the Honorable William Wall.

Once at the clubhouse, I took the cake out to place it with the array of other tasty treats (including Alexandra’s delicious curry chicken) and found it had come up to a nice room temperature (despite the heat) and it still looked beautiful. Slicing in advance was a great idea as the questions started right away about what I brought with many intrigued by the idea of a savory cake. Given the amount eaten, I would say it was definitely a success! It is a bit rich so a little goes a long way and it was very nice to have a modest slice with the other snacks.

The remaining one-third or so of the cake came back home with Tony and me and I admit we even nibbled on a little bit the next day for breakfast (a very special treat.). We decided to put the remaining slices in the freezer (carefully wrapped in plastic wrap, then foil, then stored in a zip top bag) for an easy dinner or lunch at home with a nice green salad.

Posted in Uncategorized | 2 Comments

Menu for the Week of July 13, 2014

20140713_Menu_IMG_8167_edited-1

Two at the Table_Menu_Week of July 13 2014

Welcome back to another week of great dinners at Two at the Table!

On Sunday, we’re going out to City Winery with our good friends Tom and Sharon to see Aaron Neville. Tom is a big fan and was kind enough to let us know about the show. We’re excited not only to see our friends again and Aaron Neville for the first time, but also to try a new restaurant!

Monday night we’re making something we’ve made only once before, but really loved:  Greek Salad with Oregano-Roasted Salmon. If you made the Grilled Shrimp with Black-Eyed Peas and Chimichurri last week, you probably have some oregano left over; this recipe will help you use it up. We really wanted to pair this with a Greek wine, but our on-line grocer, Fresh Direct, didn’t have any in stock, so we chose an Italian white instead: San Quirico Vernaccia di San Gimignano.

On Tuesday night we’re going to make Deb Perelman’s Tomato Scallion Shortcakes with Whipped Goat Cheese. This might be a bit of a tough recipe for us to tackle on a weeknight, since it involves baking. The shortcakes are not all that hard to make, but when you combine baking the shortcakes, making the tomato salad that goes on the shortcakes, and making the whipped goat cheese that goes on the tomatoes, it may be a little ambitious for a Tuesday. To address this, we plan to do some prep work in advance on Sunday and do the rest of the prep and all the cooking on Tuesday. This is different for us, because we rarely prep or make things in advance, but this recipe sounds so good, we had to give it a try. We’ll let you know how it goes and whether or not we’d try to do this from start to finish on a weeknight. We’ll match this up with a rosé: Pourcieux Rosé de Provence. (Please note that the link above will take you to the web site Culinary Covers and a review of this recipe by Joanne Bruno. You may remember that we made Joanne’s awesome Caramelized Onion, Spinach, Roasted Red Pepper and Ricotta Salata Crostini two weeks ago. The original recipe can be found in Deb’s great cookbook “The Smitten Kitchen”, on page 65.)

For dinner on Wednesday, we’re making an egg recipe we like a lot: Eggs Baked Over Sautéed Mushrooms and Spinach. This is tremendously savory dish, as it contains not just mushrooms and spinach but leeks too. We may throw in a little thyme, just because we think mushrooms and thyme go so well together. We thought this dish would go well with a white bordeaux, so we chose Château Haut Rian Bordeaux Blanc from Fresh Direct.

We took a trip to Spain a couple of years ago and tried a lot of different kinds of tapas. When the urge strikes us, we’ll have a “tapas night” and make a few small dishes that we share. (Tapas is usually a prelude to dinner, not a substitute for it, but we just like to do it this way.) On the menu will be Chorizo with Honey, Grilled Asparagus with Manchego, and Mushrooms with Thyme. If you have some chorizo left over from the Sheet-Pan Clambake With Mussels, Shrimp, and Chorizo, you’re in luck, because while we never would have thought to pair chorizo and honey, when we had this in Barcelona, we totally flipped for it! We’ll probably also have some caper berries, which are a fun snack, and maybe even some potato chips, which was a pretty standard offering at all the tapas bars we went to in Madrid and Barcelona. We thought we would liven things up a bit with a little sparkling wine, so we’re going to have some Spanish cava: Juvé y Camps Brut Cava Milesimé.

On Friday night, we plan to make Rachel Khoo’s Lemon and Lavender Chicken. We usually make this in the winter, but we are really in the mood for some fancy comfort food, and this dish is both fancy (but still so simple to make!) and comforting! The only changes we make to this recipe are to use chicken drumsticks and thighs rather than a whole chicken cut into pieces and to swap out the dried lavender for herbs de Provence, which contain lavender and other tasty herbs like rosemary and oregano. Kim was promoted recently, so this gives us a chance to open the split (or half bottle) of Veuve Clicquot champagne a co-workers was nice enough to give her. (Please note that the link above will take you to a slight adaptation of Rachel’s recipe. The ingredients in this adaptation are more or less the same as the original, except that the adaptation uses chicken breasts instead of a whole chicken and changes the quantities of some other ingredients. The original recipe can be found in Rachel’s fantastic cookbook, “Little Paris Kitchen”, on page 184. This cookbook is a must have for apartment dwellers, because, if you’ve seen her show on the Cooking Channel – watch it if you haven’t – Rachel is able to make all of her recipes in a kitchen so small it makes ours look palatial.)

After a pretty busy week of cooking, we’re going to treat ourselves with a dinner out on Saturday. We’ll probably go to a Belgian place nearby to sample their impressive selection of Belgian beers and their equally impressive range of recipes for mussels!

Posted in Uncategorized | Leave a comment

July 12, 2014 – Grilled Eggplant Parmesan

20140712_Grilled Eggplant Parm_IMG_8223_edited-1

On Saturday night, we made Grilled Eggplant Parmesan. This recipe offers a nice twist  on the traditional approach, as it uses tomato slices instead of tomato sauce, involves lightly grilling the eggplant and tomato before assembling, and features fontina cheese instead of mozzarella. Tony describes how he made this unique dish:

I have to say this up front – I’m not a big fan of eggplant at all. I don’t hate it, really, but I never go out of my way to make it or even order it at a restaurant. (Don’t ever tell her, but it is the one and only thing that my Very Italian Mother makes that I don’t love.) The one exception to my “Eggplant? Meh.” attitude is ratatouille, but I may be unduly influenced by the cute animated movie of the same name. I was hoping that this recipe would change my mind about eggplant and very I’m happy to say that it totally did. I’m also happy to say that we made the whole recipe so we have leftovers!

The prep work for this recipe was pretty minimal. First, I peeled a large eggplant (a vegetable peeler works great for this, but you can also use a knife) and then sliced it into 1/4 inch thick rounds. I was pretty impressed with my ability to produce very even slices just using a knife; of the 16 slices I got from the eggplant, only one was a little thin and only two were a little thick. I already knew from past experience that I really don’t like eggplant with the skin still on, but tonight I learned that I also don’t like it if it’s sliced too thick. Next time, I’ll break out the very dangerous yet highly efficient  mandoline and make more consistent slices.  I also sliced the tomatoes into 1/4 thick rounds and sliced the cheese as thinly as I could.

For this recipe, I used a fontina that comes in a wheel and that has a rind. I used about 1/3 of a wheel (a whole wheel is about 6 inches in diameter) and cut the rind off of the outer edge, but left it on the top and bottom. This is why in the photos below all the fontina slides have a brown edge on two sides. We found that the rind gave the finished dish a nice, earth nuttiness, above and beyond what the cheese itself imparts, but you can remove all the rind (or use a fontina without one) if you like.

After brushing the eggplant and tomatoes with olive oil and sprinkling them with salt (both sides for both steps, of course) it was time to start grilling. This step wasn’t difficult, as the eggplant only takes two minutes a side and the tomato only one, but that also means you have to stay on top of things.  Since we have a grill pan that stretches over two burners, I was able to cook the eggplant and tomatoes in just two batches each, which took  a total of about 20 minutes. If you’re not able to cook as many slices at once, you’ll have to budget your time accordingly. You just want to get a slight char on everything; you don’t want to cook the eggplant so long that it gets mushy and the tomatoes so long that they completely fall apart.

While the veggies were cooking I made the olive, pepper, and basil mixture. (I had a timer going on the veggies at every step and put down whatever else I was doing when it was time to tend to the veggies.) This was pretty straightforward, but it took a little longer than it should have: I was using olives with pits and had to cut the flesh off with a knife. Even so, I was able to do this and grill the veggies at the same time. I only used one tablespoon of the chopped Calabrian peppers because I had no real idea of how spicy they were – the answer is very spicy if you taste them on their own but not so spicy once mixed into the dish – but I would experiment with more next time.

The next to last step is the assembly. I simply arranged one layer of eggplant, one of tomato, one of the olive mixture, and one of the cheese on a piece of parchment paper I had placed on a baking dish. I repeated the layering process until all the ingredients were used up. The finished product looked like this (here’s where you can see the rind on the fontina):

20140712_Grilled Eggplant Parm_IMG_8200_edited-1

The final steps were cooking and resting: 15 minutes in a 450 degree oven followed by 10 minutes on the counter. While the edges of the eggplant were a little wet and runny (the tomatoes and eggplant still have quite a bit of moisture in them and the cheese gets very melty), the top was a beautiful golden brown.

20140712_Grilled Eggplant Parm_IMG_8213_edited-1

As I said, this dish really changed my mind about eggplant. The eggplant and tomatoes were tender without being mushy and the olive/pepper/basil mixture was a nice mix of briny, spicy, and herbal. What really put this dish over the top though was the fontina. It has so much more depth of flavor than mozzarella, especially with the rind left on, that I can’t imagine making this dish with any other kind of cheese. We paired this dish with some ciabatta rolls and a nice Barbera d’Alba and had another wonderful dinner.

Posted in Uncategorized | Leave a comment

July 11, 2014 – Cowboy Steak with Coffee and Chili Rub

20140711_Cowboy Steak_IMG_8194_edited-1

On Friday night, we planned to make one of our favorite recipes from Elie Krieger: Cowboy Steak with Coffee and Chili Rub. As happens sometimes, real life got in the way and we got home feeling just a little too tired to cook. Instead, we decided to have the steak for lunch the next day and to have it over an arugula salad instead of with sautéed spinach. It turned out to be so quick and easy to make that we probably should have just stuck to the plan, but then we would have missed out on a fantastic lunch!

What I enjoy most about this recipe is the great mix of ancho chili powder and ground espresso that goes into the rub. The other ingredients contribute their own flavor (especially the brown sugar), but it’s these two that really make me love this dish.

We normally make this recipe using a flank steak, which is a fairly large, and relatively thin cut. With that much steak to cover, I usually make the whole spice rub (I might even double it if I’m feeling crazy), put it in a spice shaker, sprinkle it on the steak, and rub it in. This time, however, we used a top sirloin, which is much smaller and a little thicker than the flank steak. Given the size of the steak, I thought I would do something a little different.

I decided that instead of sprinkling the rub on the steak, I would mix up the ingredients and spread them out on the cutting board like so:

20140711_Cowboy Steak_IMG_8170_edited-1

20140711_Cowboy Steak_IMG_8174_edited-1

Then I pressed both the top and bottom of the steak and all the sides into the rub, getting a nice, even coating all around.

20140711_Cowboy Steak_IMG_8173_edited-1

20140711_Cowboy Steak_IMG_8181_edited-1

I heated the grill pan on medium-high for about 10 minutes and then put the steak on for about 3 1/2 minutes per side. The meat thermometer said the steak should be on the rare side of medium-rare, which it was.

20140711_Cowboy Steak_IMG_8185_edited-1

I covered the steak with aluminum foil and let it rest for about five minutes. This step is crucial, because it allows the meat to reabsorb its juices. If you try to cut it right when it comes off the grill, you run the risk of drying it out – and making quite a mess on your cutting board!

20140711_Cowboy Steak_IMG_8186_edited-1

I sliced up the steak and served it over a bed of baby arugula. This was Kim’s idea, as she  figured – correctly – that the peppery flavor of the arugula would be a nice complement to the rub. Kim mixed the arugula with a salad dressing she made, as she always does, from scratch. For this version, she used the juice of one lemon, a heaping teaspoon of grainy mustard (to complement the mustard powder in the rub), about a quarter cup of olive oil, and salt and pepper to taste.

We paired the steak and salad with a very hoppy Dogfish Head 60 Minute IPA for a special weekend lunch.

Posted in Uncategorized | Leave a comment

July 9, 2014 – Barbecued Chicken with Short-Cut Collard Greens

20140709_Barbeuce Chicken_IMG_8159_edited-1

Tonight we made one of our favorite dinners, Barbecued Chicken with Short-Cut Collard Greens. This is probably the only dinner we make where every part of the meal is made using a short-cut: the chicken is “barbecued” in the oven, the collard-greens are cooked (at least partly) in the microwave, and the cornbread is (sometimes) bought pre-made. If it was a weekend, we would have made our own cornbread, but we’ve never made the collard greens any other way. Short of finding a way to hang a grill on the window ledge, we’ll also be barbecuing our chicken in the oven for the foreseeable future!

This timing of this recipe also works out really well. The cornbread is in the oven just long enough to season the chicken, do all the prep work for the collard greens, and clean up. The chicken and collar greens both take about the same amount of time to cook (45 minutes), so if you start then at the same time, they should be done at the same time.

The first thing I do is season the chicken. For this recipe, we always use bone-in chicken breast with the skin on. Using this cut means the chicken will take a good bit longer to cook than boneless chicken breasts, but we think they come out juicier and more flavorful, so we never do it any other way. I sprinkle the bone side and the skin side of the breast with lots of Salt Lick dry rub. Salt Lick (www.saltlickbbq.com) if you don’t know, is a phenomenal barbecue spot in Driftwood, Texas, just outside of the state capital of Austin. (There is also a location in Austin.) It is absolutely worth a visit if you’re in the area, which I would define as anywhere within 100 miles!

20140709_Barbeuce Chicken_IMG_8119_edited-1

The next step is to prepare the collard greens. The giant leaves in the photo below may look a little intimidating, but I’ve figured out a few short cuts to make them much easier to work with.

20140709_Barbeuce Chicken_IMG_8127_edited-1

The greens usually come tied together with a rubber band, so I leave that on and cut off the very bottom part of the stems, like so:

20140709_Barbeuce Chicken_IMG_8134_edited-1

Next, I remove the rest of the stem. I take one leaf at a time and fold it in half (it’s fine if it “snaps” when you do this) to expose the stem. I then run a knife down the inside edge of the stem.

20140709_Barbeuce Chicken_IMG_8135_edited-120140709_Barbeuce Chicken_IMG_8138_edited-1

I do this in a way that doesn’t cut the leaf in half, just because I find it easier to do it that way. It’s a pretty simple thing to open the leaf back up and cut it in half.

20140709_Barbeuce Chicken_IMG_8140_edited-1

Once I have all the leaves de-stemmed and cut in half, I stack the halves up and cut them crosswise into 1/2 inch strips. (The photos below just shows one leaf, but you get the idea.) By stacking the leaves, you can get through this step in no time at all.

20140709_Barbeuce Chicken_IMG_8141_edited-120140709_Barbeuce Chicken_IMG_8145_edited-1

I also know a great short cut for dicing onions, that I learned watching a cooking show (Alton Brown’s “Good Eats”, I think). First, I cut the onion in half lengthwise so that there’s a bit of stem at the bottom of each half. I cut a little bit off the top, peel the onion, and lay it cut side down on the cutting board.

20140709_Barbeuce Chicken_IMG_8150_edited-1

Next I made several cuts, starting near the stem and moving out toward the top, like so:

20140709_Barbeuce Chicken_IMG_8153_edited-1

The last step is very easy, as I just cut across the other cuts. The result is nice, even pieces, without much work at all.

20140709_Barbeuce Chicken_IMG_8154_edited-1

The cooking steps are very simple. First, I put the collard greens in large bowl with a little water, covered the bowl with plastic wrap, and microwaved for 5 minutes. (This is the step that really speeds up the process.). Once that was done, I sautéed the onions for a couple of minutes, added the remaining ingredients, covered the pot, and let things simmer for about 30 minutes. At the same time that I put the greens in the microwave, I put the chicken in a 350 degree oven. I checked the temperature with a meat thermometer after about 20 minutes and put the chicken back in, as it needed more time. After another 10 minutes, I checked the chicken again and it was right at 160 degrees. I slathered both pieces with Stubb’s barbecue sauce (Stubb’s – www.stubbsaustin.com – is another great barbecue spot in Austin) and put them back in the oven for 5 more minutes, just to warm up the sauce.

So there you have it. A few short cuts, minimal cooking, and another fun dinner for Two at the Table!

Posted in Uncategorized | 5 Comments