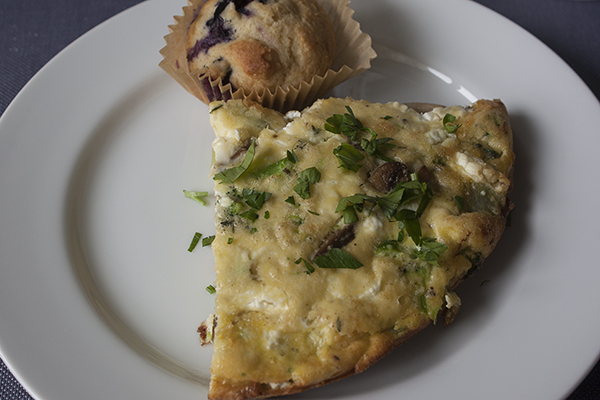
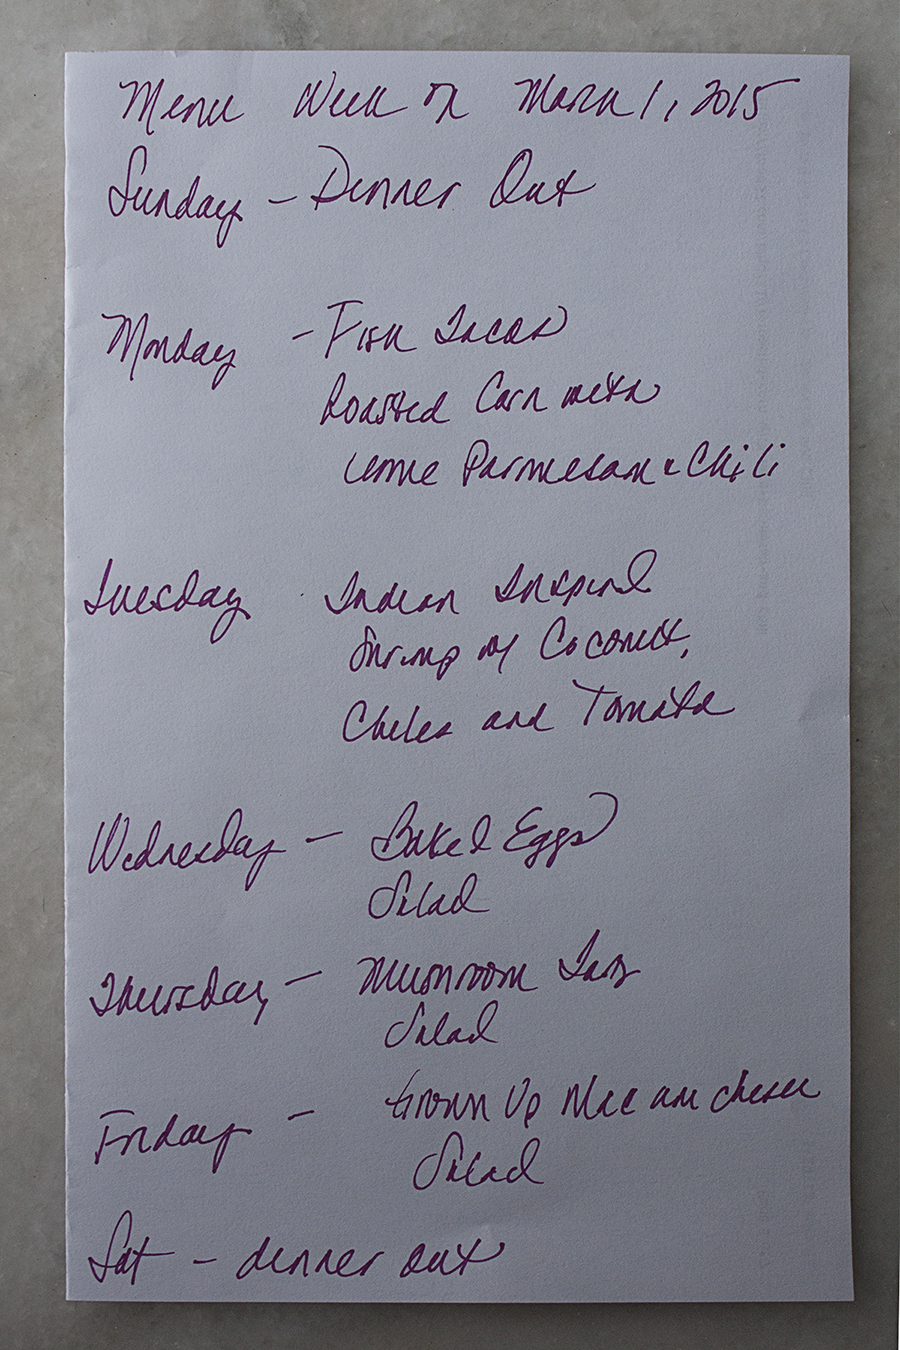
March 6, 2015 – Grown Up Mac and Cheese

I put the pasta into the boiling salted water with a drizzle of olive oil and set the timer for six minutes. Meanwhile in a small saucepan, I gently heated the milk and in a separate medium sauce pan, melted the butter. I then whisked in the flour and cooked the mixture for two minutes. I then slowly added the hot milk and cooked for an additional two minutes. I used fat-free milk so had to cook it and additional minute for it to become a bit thicker. I think next time I would use milk with a little fat in it just to have a slightly better consistency but if all I had was fat-free, I would use it again without hesitation.

By now it was time to check on the pasta which needed just an additional 30 seconds. I drained the pasta and returned my attention to the milk, butter, flour mixture. I turned off the heat and added the three cheeses, along with salt, pepper and nutmeg. I then stirred in the pasta. I then poured the mac and cheese into the two gratin dishes that I had set on a half sheet pan lined with parchment paper. I was glad I did this because some of the cheese mixture spilled over just a bit. I sprinkled the basil/bread crumb combination on top and they were ready to go into the oven. I set the timer for 35 minutes.

With the gratins in the oven, I could pull together a simple salad of mixed greens and fresh herbs (I used parsley, chives, and basil) and make a lemon-Dijon vinaigrette. Tony was then kind enough to come in do the dishes for me.

As the mac and cheese cooked, it began to smell incredible after about 20 minutes and we could hardly wait to try it. It was perfect after 35 minutes and we were definitely ready to give it a try!

This was most definitely mac and cheese for grown ups! The combination of the three cheeses was just incredible and the blue cheese was an amazing addition. We both honestly can say that we didn’t miss the bacon in it at all.  I’m really glad that I decided to do only a simple salad with the mac and cheese–I think anything heavier would have been too much! I am also glad that I decided to make this in winter–this is comfort food at the highest level and I can’t imagine enjoying this in warmer months as much as we did on a cold, winter night.

Grown Up Mac and Cheese was an incredibly flavorful and decadent dish and we savored every single rich, creamy bite. It paired very nicely with Wines by the Flask’s suggestion of 2013 Statti Lamezia from Calabria. That said, it was so very special tasting, I think the next time I make this, I’ll real up the game and pair it with Champagne.

Posted in Uncategorized | 1 Comment

March 4, 2015 – Herbed-Baked Eggs

For Wednesday night, we planned a simple dinner of Herbed-Baked Eggsfrom Ina Garten’s Barefoot in Paris cookbook, French bread and green salad. It turned out it was a lesson in paying attention and following the directions. Kim shares her lessons learned.

I’ve made this recipe before. It’s simple. It’s easy to follow. It’s delicious. This time–not quite as tasty as normal. In short, I overcooked the eggs, but more on how that happened in a moment.

I started first by making a simple salad dressing of fresh lemon juice (about half a large lemon), half a teaspoon of Dijon mustard, olive oil and salt and pepper. I set this aside, put  some baby salad greens and chopped parsley into a large bowl, and then turned my attention to the eggs.

For the eggs, I began with the herb mixture (probably going a bit heavy since we tend to like fresh herbs a lot.) The herb mixture is super simple: a little bit of fresh garlic (I used one small clove), minced thyme, minced rosemary, chopped parsley and freshly grated Parmesan cheese, which I combined into a small ramekin. I set this aside. So far so good!

I then got the eggs ready by getting down two bowls and cracking three eggs into each bowl. About this time, I turned on the broiler. I thought the top rack seemed a little close…and the directions are pretty clear: put the rack 6 inches below the heat. I probably should have measured or checked again…but I didn’t.

Into each of two gratin dishes (placed on a baking sheet lined with parchment paper to keep them from sliding) I put one tablespoon of cream and half a tablespoon of butter. Into the oven it went for three minutes.

During the three minutes, I noticed a faint smell of burning. It was the parchment paper. This should have been my second clue that maybe the rack was a little too close to the broiler. But I pressed on, even though the mixture was definitely bubbly and almost starting to burn, once again making no adjustments to the placement of the rack.

The next step of quickly and carefully poring the eggs into each gratin dish went smoothly as did sprinkling on the herb mixture and the salt and pepper. Back under the broiler they went for five minutes. What came out was not the slightly runny eggs that I was used but something much more firm and well, a little tiny bit burned on top. I was so disappointed and at this point I was really sure the rack was too close. Despite my protests, Tony convinced me to have serve it any way.

The eggs were fine but it was a little more like having our own frittata or omelet than baked eggs. The herbs in them were still delicious. The salad was a perfect pairing and overall the whole dinner was saved by an incredible selection by Wines by the Flask of Graham Beck’s Brut (sparking wine). It was dry, delicious and a perfect match.

For the record, I did go back and measure the position of the racks. The first one is four inches from the broiler, the second one is seven inches from the broiler. I strongly suspect that when I’ve made this before, I had the rack placed seven inches from the broiler. I’ll be making this again soon with adjustment so the placement of the rack. Stay tuned!

Posted in Uncategorized | Leave a comment

March 3, 2015 – Indian-Inspired Shrimp with Coconut, Chiles, and Tomato.

20150303_Indian Shrimp_IMG_9137 copy

Last Tuesday night were transported to Morocco with some new flavor combinations for us. After last week’s success, we decided to continued with the exotic theme for this Tuesday night. While we’ve had Indian food many times before, this was our first attempt to make it. We were not disappointed! Kim tells how it went.

Admittedly, I looked at some Indian food recipes and was a little taken aback by the time and steps involved. So, when I found Emeril Lagasse’s  Indian-Inspired Shrimp with Coconut, Chiles, and Tomato I was very optimistic for a recipe that could deliver some different flavor combinations but also be realistic for a weeknight. It did not disappoint.

Thinking the basmati rice would take an hour, I looked at the directions for that first. I was pleasantly surprised that the basmati rice only took 25 minutes to cook! Following the package directions, I measured out the water, rice and butter and set aside to turn my attention to the shrimp dish. 

I started first by doing the prep work: measuring out a quarter cup of vegetable oil and two teaspoons each of mustard seeds and cumin (the recipe said cumin seeds, which I did not have and did not want to buy, so I substituted ground cumin with terrific results). I then turned my attention to chopping a cup and a half of red onion (for me it was about one medium red onion, plus half of a small one left over from Monday’s fish tacos). After that, I chopped the chiles (I used one, very large jalapeño), and minced three tablespoons of ginger (I keep ginger in the freezer and defrosted it in the microwave for about 10 seconds before mincing it) and two tablespoons of garlic. I then measured out the quarter cup of tomato paste and made sure that the cans of diced tomatoes and coconut milk were accessible and ready to go. I had purchased shrimp that were already cleaned and deveined so they already to go when I needed them. The last thing to chop was the cilantro.

Before starting cooking the shrimp dish, I got the rice started. The shrimp part of the dish is pretty fast so after the rice cooked for about five to 10 minutes, I started on it.

In the Dutch oven, I started first by heating the oil over medium heat and then added the spices. It was already smelling great! I then added the onions, jalapeños, ginger, and garlic. I was very nervous about adding garlic at this step as I always seem to burn it but it worked just fine. I sautéed the ingredients, stirring occasionally, for about 7 minutes until the onions were slightly caramelized. In went the tomato paste; I gave it a good stir to ensure it was well incorporated and cooked everything for an additional two minutes. I then added the diced tomatoes and cooked an everything for an additional three minutes, until the liquid in the mixture was reduced by half. I turned the heat up to high and added the coconut milk. The entire mixture began to bubble and became even more fragrant and turned a beautiful orange color. After about three minutes, the mixture had reduced by half. During this time I had gotten the shrimp out, patted them dry, and seasoned them with salt. The shrimp went into the bubbling sauce and began to cook immediately. After five minutes they were ready. I turned off the heat, tasted the sauce (delicious!) and added the cilantro and a little more salt, which really brought it to the next level.

I plated by putting down a small scoop of rice, ladling the shrimp mixture over it, then adding a sprig of cilantro as garnish and our Indian-themed dinner was served!

The rice was cooked perfectly and made for nice base for the shrimp. The combination of spices with the coconut, ginger, chilies, and tomatoes was incredible, flavorful and just the right amount of spice. It was very different from anything we had made before. It sort of felt like we had ordered take out–but so much better!

Posted in Uncategorized | Leave a comment

March 2, 2015 – Fish Tacos with Tomatillo-Jalapeno Salsa and Roasted Corn with Lime, Parmesan, and Chili

20150302_Fish Tacos with Tomatillo Salsa_IMG_9134 copy

Monday night was a delicious, fun dinner with Food & Wine’s Fish Tacos with Tomatillo-Jalapeño Salsa and Food 52’s Roasted Corn with Lime, Parmesan, and Chili. Kim tells how it went.

I started by making the Tomatillo-Jalapeño Salsa. I first husked the tomatillos. The package I purchased had six tomatillos in it and the recipe only called for four so I decided to just increase the other ingredients a little bit so that I wouldn’t have leftover tomatillos.

20150302_Fish Tacos with Tomatillo Salsa_111_edited-1

I then quartered the tomatillos and put them into a blender. I added the cilantro, chopped jalapeño (I had one very large one), the juice of two limes, and a bit more than a tablespoon of vegetable oil. In just a few moments in the blender, I had a very fresh tasting tomatillo-jalapeño salsa. I added just a little bit of salt and it was ready for the tacos. We froze the extra salsa to make the tacos again or perhaps for something else.

I then turned my attention to fixing the garnishes for the tacos–slicing half moons of cucumber and red onion and dicing some avocado (with a good squeeze of lime juice to keep it from turning brown). I also put some corn tortillas in foil so I could warm them on the grill pan while I was cooking the fish.

I then made the marinade, which I cut in half since we were only making tacos for two and the original recipe servers four people.

I then turned my attention to making the Roasted Corn with Lime, Parmesan, and Chili first by preheating the oven to 400 degrees. Rather than ears of corn as the recipe suggested, I purchased some very tasty sounding Hudson Valley Harvest Sweet Corn and we were not disappointed. I started first by spreading the corn on a foil-lined, rimmed half sheet pan and then tossing with olive oil and salt and pepper. 

As the oven was preheating, I made the “dressing” for the corn. I used one tablespoon of mayonnaise and one tablespoon of non-fat Greek yogurt. (I did not want to buy sour cream to use just one tablespoon and this turned out to be a fine substation.)  The recipe called for the mayonnaise, sour cream and milk to be at room temperature and by the time the corn came out of the oven, the entire dressing probably was at that temperature. I then added the quarter cup of milk, the juice of one lime, and some freshly grated Parmesan. I whisked it all together with the cayenne, tasked and adjusted the cayenne by adding a bit more.

For the last 10 minutes that the corn was roasting in the oven, I preheated my grill pan and let the fish (the recipe called for halibut which was not available so I used flounder) sit in the marinade for just a couple of minutes, I salted the fish and then grilled for about three minutes per side. After taking the corn out and tossing with the “dressing,” I flaked the fish and it was time to make some tacos!

Both recipes turned out great. The fish was moist and flavorful, but the best part was absolutely the tomatillo-jalapeño salsa which added wonderful freshness and brightness without overwhelming the fish. The garnishes of red onion, cucumber, and avocado were terrific compliments to the fish and the salsa. We will be making these again for sure and I’m really hopeful the extra salsa freezes well.

The corn was outstanding–an amazing combination of creaminess, acidity, and heat. It tasted so flavorful, it was surprising how few steps it took to make something so great.

This was a really fun and delicious dinner and like our other favorite fish tacos, definitely easy enough for a weeknight. It will be hard to choose between to the two for our next fish taco dinner!

Posted in Uncategorized | 2 Comments

Special Feature: Sunday Brunch (Mushroom, Broccoli and Goat Cheese Frittata and Blueberry Muffins)

20150301_Broccoli and Goat Cheese Frittata_IMG_9127_edited-1

Brunch out in New York City, while a fun, social activity, can also mean long lines and crowds. Many times, we opt to do our own brunch at home. For brunch this past Sunday, Kim decided to make a Mushroom, Broccoli and Goat Cheese Frittata and Blueberry Muffins. Kim tells how it went.

I actually made the blueberry muffins on Saturday and did some of the prep for the Frittata.

My recipe for blueberry muffins is very special as it came from my Great Aunt Kathryn and I believe the origins of it are when she and her family would pick blueberries at their summer home in Michigan. The recipe is simple and quick and makes very tasty muffins that aren’t too large. I have found the recipe to be very versatile and adaptable. I’ve done simple variations like adding lemon zest, which really made for an updated twist and have even gone as far as to using other berries (strawberries and lime zest and raspberry and orange zest–all with fantastic results.)

I started first by preheating the oven to 400 degrees and melting (in the microwave) four tablespoons of butter. As the butter cooled, I beat in a large measuring cup 1/2 cup of milk (I used fat-free, but whole works well too) and one large egg. Once the butter was cooled, I beat that into the milk/egg mixture. I then turned to measuring the dry ingredients. The recipe calls for one-and-a-half cups of all-purpose flour. I had only one cup of all-purpose flour but plenty of whole wheat pastry flour so I used that for the last half a cup, which worked just fine. I sifted the flour into a large bowl with 1/2 cup of sugar, 2 teaspoons of baking powder and 1/2 teaspoon of salt. I then added the milk/egg/butter mixture to the dry ingredients and mixed to combine. I then added one cup of blueberries (I had some from the summer that I had frozen and defrosted by running under cold water.) Using an ice cream scoop, I put the mixture into a muffin tin lined with baking cups (the recipe makes 12 muffins) and baked for 20 minutes. The recipe takes 20 to 25 minutes and mine ended up taking about 22 minutes in total.

As the muffins baked and cooled, I turned my attention to doing some prep for the frittata. I first defrosted and chopped up some broccoli spears (about half to two-thirds of a 10 oz package) and sautéed some mushrooms (about 8 ounces) in some olive oil and thyme. Into the refrigerator the vegetables went so they would be ready for Sunday when I made the frittata.

On Sunday, I started making the frittata by preheating the oven to 375 degrees. I then whisked together (a lot!) eight eggs with just shy of a half of cup of parmesan cheese, one teaspoon of salt and several big grinds of black pepper. I then added in the mushrooms and broccoli. Using a 10 inch non-stick skillet, I heated over medium heat about one tablespoon of olive oil.  Once the oil was hot, I poured in the  egg mixture and then dotted goat cheese all around. I let it cook for about five minutes. I wait until it is set around the edges and the mixture is bubbling a bit. I then slide the pan into the oven to cook for 20 minutes. Meanwhile, I could clean up the kitchen a bit, get the muffins out and make sure we had enough coffee to enjoy with our brunch.

After 20 minutes the frittata was set and perfectly cooked and ready to come out of the pan.

20150301_Broccoli and Goat Cheese Frittata_IMG_9123_edited-1

I ran a spatula around the edges to loosen it a bit and then slide it on to a cutting board. I cut it into four wedges.

20150301_Broccoli and Goat Cheese Frittata_IMG_9124_edited-1

With a quick garnish of parsley, brunch was served!

Posted in Uncategorized | Leave a comment

Menu for the Week of March 1

20150301_Menu_IMG_9132_edited-1

Two at the Table continues with the theme of only eating vegetarian, fish and seafood.  This week’s menu ranges from Mexican to Indian to even a little French-inspired. We finish the week with a grown-up take on a classic.

Sunday night we have a fundraising event to go to for Tony’s nephews, so we’ll be having dinner as part of that event and not cooking.

Monday night features Food & Wine’s Fish Tacos with Tomatillo-Jalapeño Salsa and Food 52’s Roasted Corn with Lime, Parmesan, and Chili. We love making fish tacos and this is a new recipe for us so we are exited to see if this stands up to our favorite version.

Like last Tuesday night where we tried something different by making cuisine from Morocco, this Tuesday night we are trying our hand at Indian food for the first time. We are starting out relatively simply with Indian-Inspired Shrimp with Coconut, Chiles, and Tomato. We hope that this dish goes well, as it will be fun to expand the  range of  food we make.

Wednesday night brings an elegant, simple dinner from Ina Garten’s Barefoot in Paris cookbook with Herbed-Baked Eggs. We will pair this with bread and a simple green salad.

Thursday night features the return of an old favorite, Real Simple’s Flaky Mushroom and Gruyère Tarts, which is also served with a salad.

Friday night will be a cozy night in with Ina Garten’s Grown Up Mac and Cheese. While the recipe does call for bacon, which we are certain makes this even tastier, we are going to omit it this time around.

Finally, on Saturday night we are going with our good friends Alexandra and Eric (and a few others) for a tour of the Van Brunt Stillhouse in Brooklyn. We’ve done this once before and had a terrific time and we are thrilled to return. Since we made these plans long before we  decided to give up meat and poultry for Lent, we are going to break our rule of no meat/poultry and enjoy some BBQ at Hometown BBQ as we did on our first trip to Van Brunt Stillhouse.

Posted in Uncategorized | Leave a comment

Special Feature: Blueberry Buttermilk Pancakes

For Tony’s birthday on January 11, we talked about going out for breakfast, but I wanted to make a special breakfast for him. He loves Ellie Krieger’s whole wheat pancakes (I use the recipe in her cookbook, “The Food You Crave”, you can find a similar recipe here.), but  I decided to make them even more exiting by adding blueberries. I had stocked up on blueberries when they were in season over the summer and then froze them just for purposes like this.

I always make the full pancake recipe, rather than cut it in half, as the leftover pancakes reheat well make for a delightful treat for breakfast during the work week.  I started by measuring out the wet and dry ingredients, preheating the griddle, and preheating the oven to 200 degrees, so that I could keep the pancakes warm as I made them. I also got out about 1 cup of blueberries and let them thaw by running some cold water over them and then draining them as I made the pancake batter.

The combination of the all-purpose flour and whole wheat pastry flour called for in the recipe makes for slightly heartier and nuttier tasting pancake; the buttermilk gives them that perfect pancake flavor. After combining the wet and dry ingredients, I was ready to start cooking.

The cast iron griddle (the other side of our grill pan, the done without the ridges that give everything such pretty grill marks) goes across two burners, meaning I can make three pancakes at a time. I sprayed the grill pan with cooking spray and used a 1/4 measuring cup to ladle the batter on to the hot griddle. Once bubbles starting forming on top of the pancakes (mine took a little longer than the minute and half that directions stated), I dotted the blueberries all around the top of the pancakes and flipped them. Another few minutes of cooking on the other side and they were ready to go into the oven to stay warm. I sprayed the griddle with cooking spray again (I find I have to do this for every batch) and made another three pancakes. I repeated until I had 12 pancakes.

We enjoyed the blueberry pancakes with a drizzle of maple syrup and some hot, black coffee. Who needs birthday breakfast out!

Posted in Uncategorized | Leave a comment

Grilled Swordfish with Cilantro Chile-Vinaigrette and Moroccan Vegetable Couscous

20150224_Swordfish and Cous Cous_IMG_9115 copy

Tuesday night featured a Moroccan theme with Food & Wine’s Grilled Swordfish with Cilantro-Chile Vinaigrette and Food 52’s Moroccan Vegetable Couscous. This was a little bit more than we normally tackle on a weeknight and Kim shares how it went.

I started first by making the recipes’s own ras-el-hanout, a Moroccan spice blend. This was an easy step that involved simply measuring out the right amounts of saffron, cumin, ground ginger, salt, turmeric, cinnamon, cardamom, coriander (I only had seeds so I crushed them just bit with a wooden spoon), nutmeg and black pepper. The mixture smelled wonderful and exotic and in one step, I already felt like I was really making a Moroccan meal.

I then prepped the vegetables (onion, garlic, carrots, potatoes and zucchini) for the couscous and drained the chick peas. The recipe also called for a 28-ounce can of whole San Marzano tomatoes to be chopped which I made a reasonable attempt to do with my kitchen shears right in the can–it worked fairly well and I definitely had no mess.

I also set aside one cup of vegetable broth (the one not used for Sunday’s Mushroom Bourguignon) and measured out one cup of couscous.

From there I turned my attention to the Cilantro-Chile Vinaigrette for the fish, which Food & Wine described as a smoky version of charmoula, a Moroccan herb sauce. So as not to dirty another bowl, I simply made it in a large measuring cup, starting first by measuring out a quarter cup of olive oil (since I was only making half), then adding the chopped cilantro and parsley, minced garlic clove, a tablespoon of lemon juice, one diced jalapeño (I used a green  instead of the recommended Fresno or red jalapeño since I happened to have it around), saffron, crushed red pepper, smoked paprika and cayenne. I mixed together, tasted and adjusted a little by adding a little salt and a touch more olive oil. The consistency and some of the flavor profile reminded me of when I’ve made chimichurri. I set it aside and turned my attention back to the vegetable topping for the couscous.

I started toasting the spice mixture in a small skillet for just a moment or two. I then  sautéed the onion in a Dutch oven for about five minutes as mine cooked fairly quickly (about two minutes less than the recipe suggested.) I then added the carrots and potato (but not the garlic as the recipe suggested because I have bad luck with burning garlic if I put it in too early) and sautéed for about three minutes. I then added the tomatoes (breaking up any really large pieces) and the spice mixture, which really added a dramatic and immediate, wonderful aromatic effect. I let it simmer for 20 minutes and used the time to clean up the kitchen a bit.

Just before adding the zucchini and chick peas to the vegetables, I started the vegetable stock boiling for the couscous and had that ready and waiting. I also started preheating the grill pan and brushing the swordfish with olive oil and sprinkling it with salt and pepper.

After adding the zucchini and chick peas to the onion, carrot, potato, tomato mixture, I turned my attention to grilling the swordfish for three minutes on one side and then two minutes on the other side. I almost forgot to add the butter after turning the fish as the recipe suggests, but I’m glad I did as it added a nice richness.

I gave the vegetables for the couscous one last taste and added just a little bit of salt to bring out all the wonderful flavors.

I started plating first by putting down the swordfish and then spooning on the cilantro-chile vinaigrette. I then put a small mound of couscous on the plate and put the vegetable mixture on top with a garnish of parsley. I served this with a wonderful wine, Goisot Exogyra Virgula Sauvignon de Saint-Bris 2012, which had a nice minerality that paired very well with the exotic tasting meal.

This dinner was something very different from anything we’ve ever made in terms of spices and flavor combinations and really made us feel that we were eating something special and unique. The swordfish was excellent with the cilantro-chile vinaigrette, which was a nice mixture of herbal flavor and heat from the spices. The vegetable couscous was rich, hearty, and flavorful and even made Tony want to try chick peas. It might have been more than we would normally tackle on a week night but it was worth it to feel like we had a night in a foreign land.

Posted in Uncategorized | 1 Comment

February 22, 2015 – Mushroom Bourguignon

20150222_Mushroom Bouguignon_IMG_9113_edited-1

After falling in love with Rachel Khoo’s Boeuf Bourguignon, we thought we’d make Smitten Kitchen’s Mushroom Bourguignon for a vegetarian twist on this French classic. Kim tells how it went.

I started by doing almost all the prep in advance, which was very easy but took a little longer than expected. I started by getting out the butter to soften and slicing two pounds of (huge) Portobello mushroom caps (I think this is what added the time as I was trying to be meticulous about making them all quarter-inch slices). I then moved on to chopping the carrot, onion, and garlic; stripping thyme leaves from the stems; and measuring the wine. There was no need to measure the vegetable stock as I had purchased a two cup container, which was exactly the amount needed for the recipe. I also got out the flour and tomato paste. I decided to save peeling the pearl onions and do those during the two later steps of sautéing the carrots and onions (10 minutes) and cooking the mushrooms (20 minutes).

Two pounds of mushroom is a lot and I was a bit leery of putting them all in the pot and “searing” them as the recipe said. After putting them in and realizing they would never brown, I ended up taking about half out and doing them in two batches. I’m not sure if I was slow or had very watery mushrooms but mine released a lot of liquid very quickly. I wasn’t worried as they did brown but I knew all the liquid probably wasn’t the best for sautéing carrots, onions and thyme, the next step.

The liquid released from the mushrooms smelled amazing and I decided to pour it into a measuring cup and use it for the broth in place of the vegetable stock. I consulted with Tony on this step to ensure it really did smell as good as I thought and he said go for it. The liquid measured out at just about 1.5 cups so I simply added a half a cup from my vegetable stock (which, now that is open, I think I will use in Tuesday night’s  Moroccan Vegetable Cous Cous from Food 52) and set it aside until I needed it.

I then turned my attention to sautéing carrots, onions and thyme for 9 minutes. I  added the garlic for the last minute, during which time I mixed the butter and flour together and made good progress on peeling the pearl onions (not my favorite activity, but they make for a nice touch!). I then added the wine and it really bubbled up nicely and picked up the nice brown bits on the bottom of the Dutch oven. In went the tomato paste (honestly, I didn’t measure out the two tablespoons but kind of eyeballed it) and the mushroom liquid/vegetable broth. Back the mushrooms went into the Dutch oven (with the juices that had collected) and it was set to simmer for 20 minutes, while I continued to peel pearl onions.

After 20 minutes, the Mushroom Bourguignon was starting to look very much like Bourguignon and I added the pearl onions and simmered an additional five minutes.

I then added the butter and flour mixture and stirred it in and simmered for 10 more minutes. The last minute or so, I thought it was a little thin and as the directions suggested, turned up the heat a little bit. I tasted it and adjusted with a little salt and pepper and dinner was ready to be served.

I choose to use parsley as the garnish and rather than using egg noodles, I simply served the Mushroom Bourguignon with whole grain bread so that we could sop up those delicious juices. We paired this with a wonderful 2012 Vietti Barberea D’Asti recommended by Wines by the Flask (which I also used when cooking).

We loved the Mushroom Bourguignon—it was rich, earthy and had a wonderful, meaty texture from the Portobello mushrooms. It was a hearty and satisfying meal on a cold winter night. It paired terrifically with the Barbera, which also has a nice, big flavor with a touch of earthiness. I will definitely be making this again—perhaps even doing a “Bourguignon Off”—comparing Boeuf Bourguignon with Mushroom Bourguignon!

Posted in Uncategorized | 1 Comment

Puy Lentil Salad with Goats’ Cheese, Beetroot and Dill Vinaigrette

20150219_Lentil and Roasted Beet Salad_IMG_9102_edited-1

For Thursday night dinner, Kim made Rachel Khoo’s Puy Lentil Salad With Goats’ Cheese, Beetroot, and Dill Vinaigrette which paired in a charming way with Wines by the Flask‘s suggestion of 2013 Louis Metaireau Muscadet. Kim tells how it went.

I started first by working on the beets, which I planned to roast. The minimum order on Fresh Direct was two beets, so even though the recipe only called for one, I decided to make both. The beets were on the smaller side and it ended up being the perfect amount. I started by preheating the oven to 400 degrees, lining two sheet pans with foil and  laying down some parchment paper on my cutting board. The last step was so that as I peeled and sliced the beets, I didn’t stain my wood cutting board. After the beets were peeled and sliced (about 1/4 to 1/2 inch slices), I tossed them on the sheet pans with some sunflower oil (since I would be using this in the dill vinaigrette later) and a little salt. Into the oven they went to roast for about 35 minutes.

I then turned my attention to the lentils. I filled up the tea kettle with water and got that going to boil. I then rinsed and put the lentils into a pot with the bay leaf, thyme and salt. I then covered them with the boiling water (at least double in volume as the directions stated), covered with a lid and let them simmer as I worked on the dill vinaigrette. I also got out the goat cheese so that it could come up to a nice temperature and not be so cold next to the warm lentils and beets.

The directions suggested making the dill vinaigrette in a blender. In our tiny New York City kitchen, the blender is up high and I didn’t feel like getting the step-ladder, so I opted to use the food processor since that is much more accessible due to its relatively frequent use.  I put about half of my bunch of dill in the food processor and then added the sunflower oil, salt and sugar and pulse it until it became a nice thick, dressing consistency. I tasted and adjusted the salt ever-so-slightly and tasted again. Delicious. As a I looked at the other half of the dill and realized I was unsure what to do with rest of it and thought, why not make double the dressing? I thought it might make for an interesting accompaniment to bagels, smoked salmon and cream cheese over the weekend. But more on this later in the post script.

As cleaned up from the making of the dill vinaigrette, I checked on the lentils, which need just an additional few minutes of cooking time. I then drained them and had them ready to go for when the beets came out of the oven and it was time to start assembling the salad.

The beets were nicely roasted and it was time to start plating. I first laid down some baby romaine, then added a nice serving of lentils, arranged beet slices on top and the dotted the plate with the goat cheese and dill vinaigrette. I finished the plate with a drizzle of olive oil and a sprinkling of fleur de sel and quick grind of pepper. Dinner was served.

The lentils, with their slightly earthy bite paired nicely with the also earthy but slight sweet beets, the dill vinaigrette added a wonderful herby brightness and the goat cheese added creaminess and a tangy note. The 2013 Louis Metaireau Muscadet paired in a delightful way with all the many flavors.

P.S. We tried the dill vinaigrette on Saturday morning with bagels, cream cheese and smoked salmon–it was terrific! We liked it so much we had it again on Sunday. I’m trying freezing the rest of the dill  vinaigrette for perhaps a piece of roasted salmon. More on that soon!

Posted in Uncategorized | 1 Comment