August 7, 2014 – Flatbreads with Wildflower Honey Goat Cheese, Arugula, and Grilled Peaches

20140806_Goat Cheese Peach Flatbreads_IMG_8587_edited-1

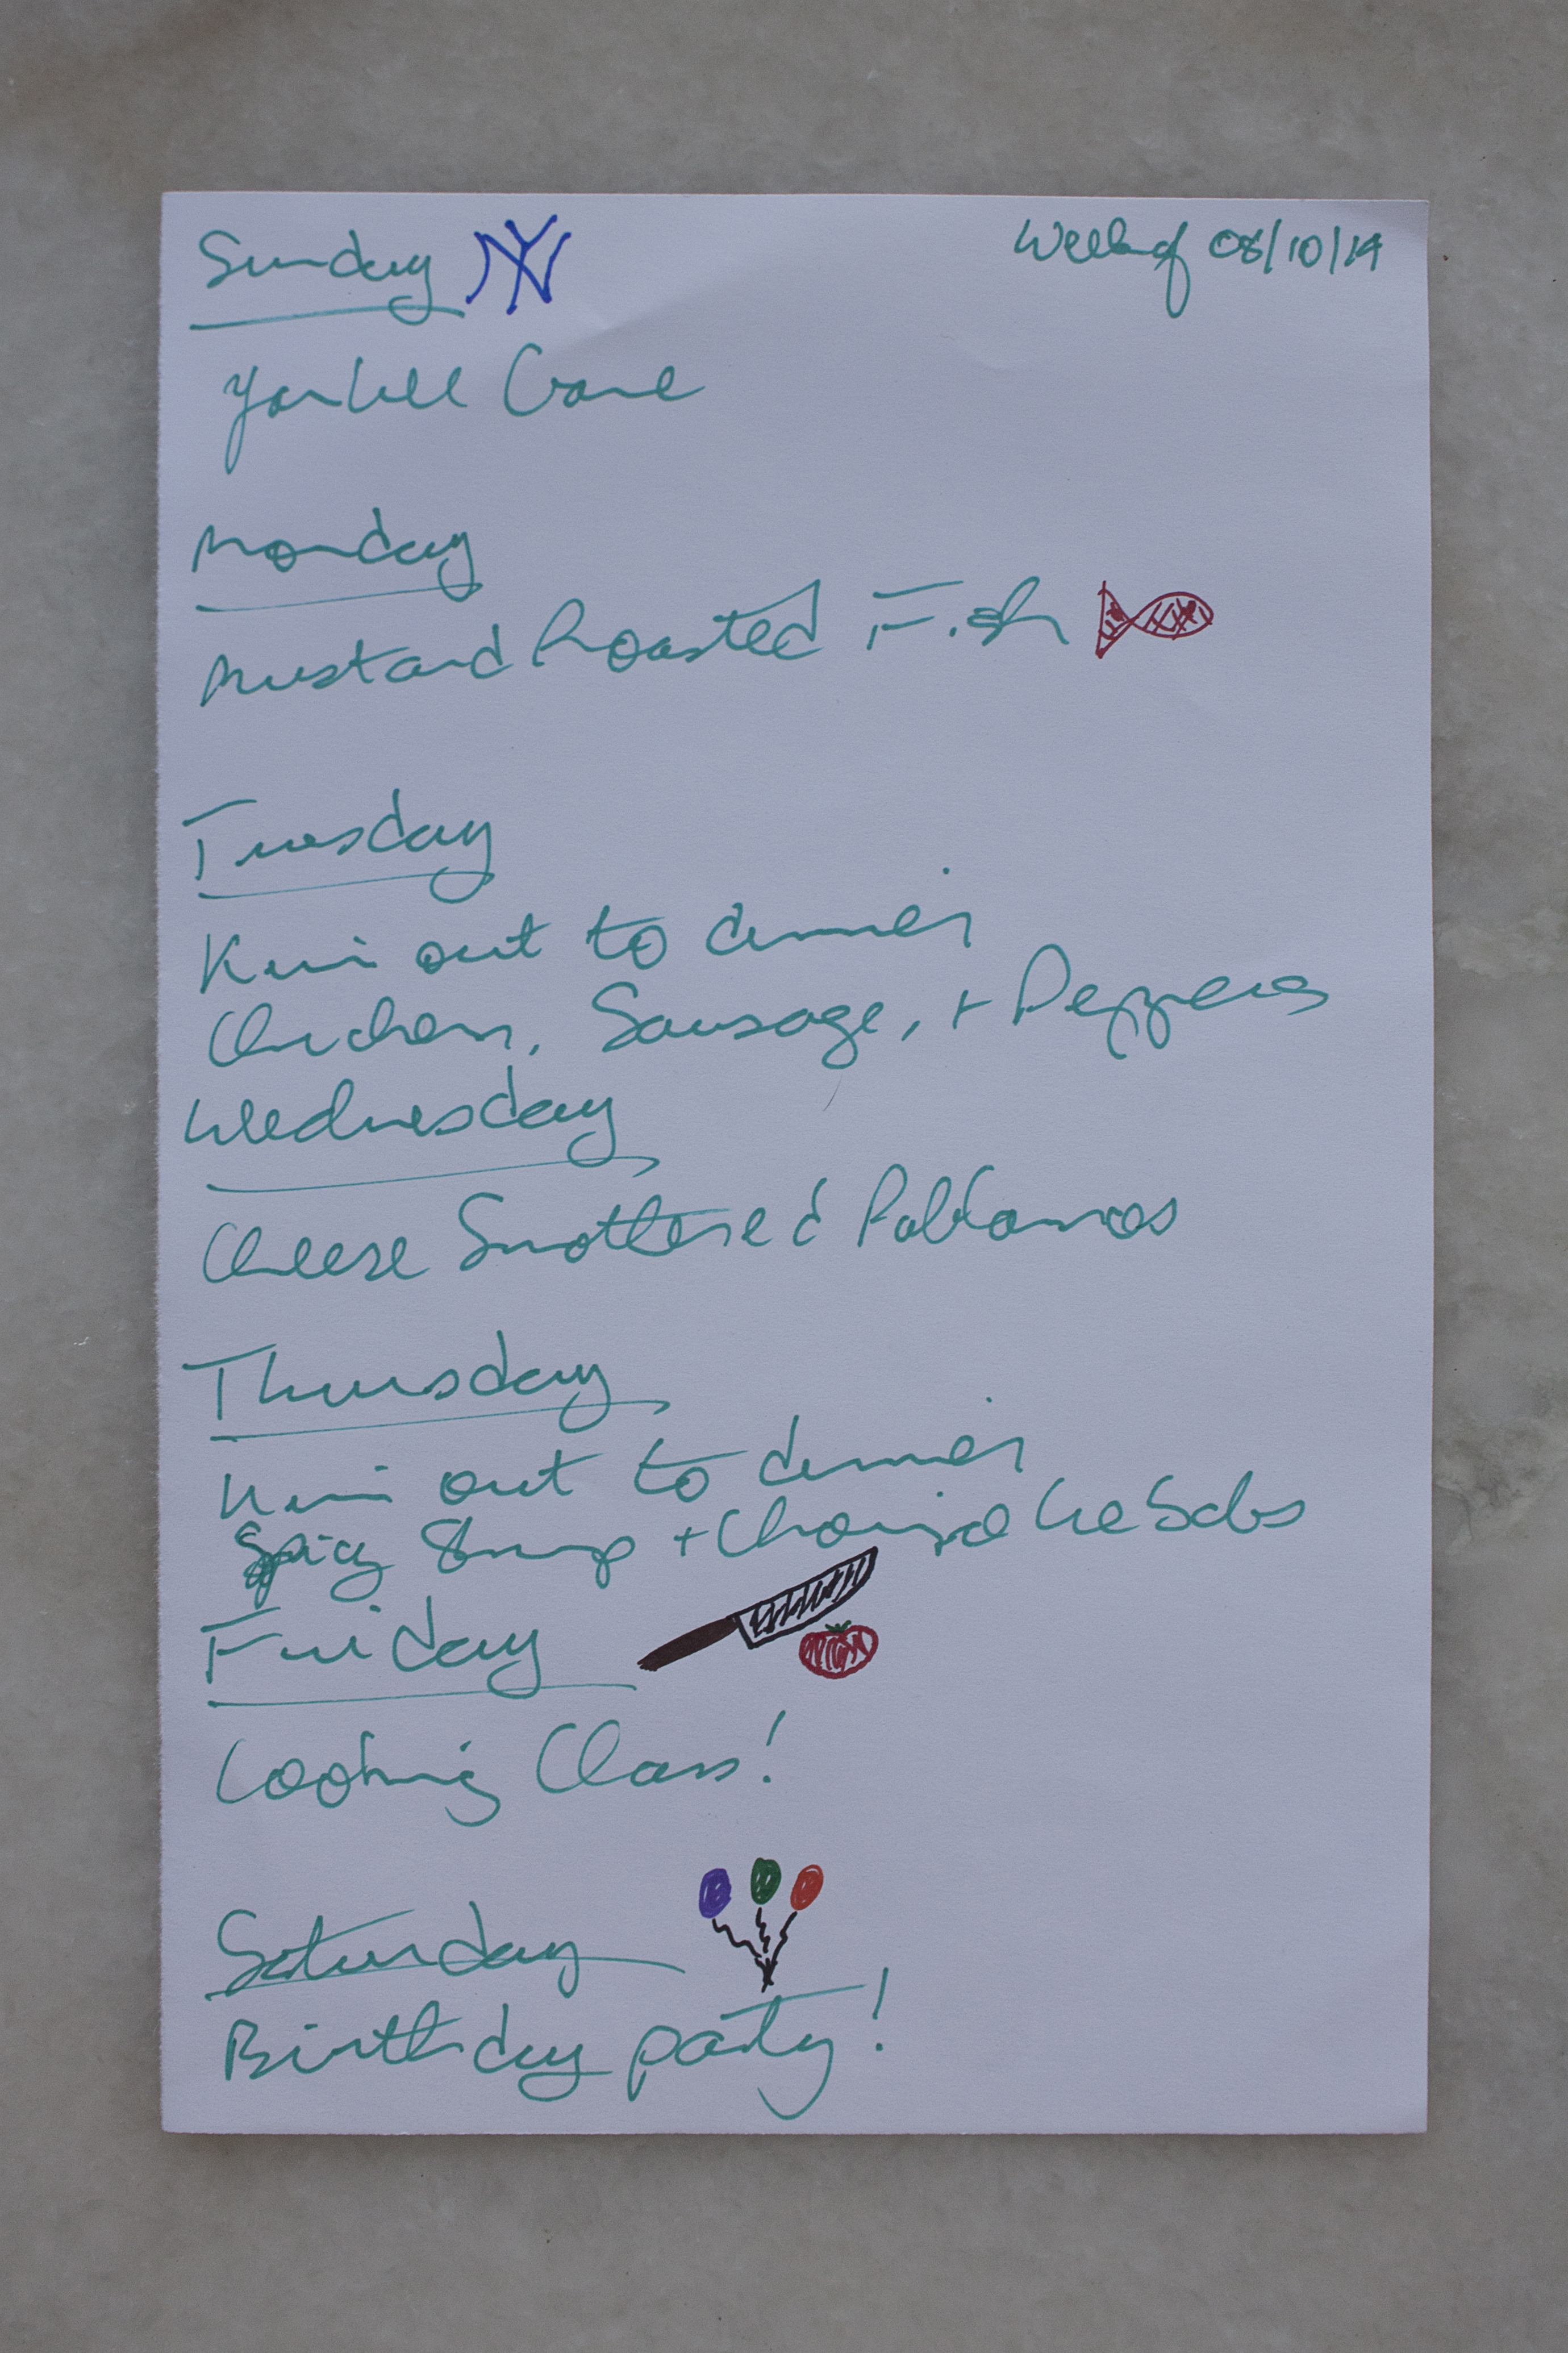
On Thursday night, we made a recipe of our own creation: Flatbreads with Wildflower Honey Goat Cheese, Arugula, and Grilled Peaches. We used things we already had in the fridge (frozen pizza dough and arugula) plus things we found on Long Island (the goat cheese and  peaches) to put together a fun dinner. Tony describes how he did it:

The very first step was to take the goat cheese out of the fridge so that it would have a chance to soften and become easier to spread.

The next step was to grill the peaches. First, I preheated our cast iron grill pan on medium-high. Then I moved on to prepping the  peaches. I started with two peaches as I figured that would be plenty for two flatbreads. Looking down at the top of each peach, I turned it so that the natural “crease” on the peach ran from left to right. I then cut all the way around the peach, following the line of this crease, with the stone preventing me from cutting the peach entirely in half. I then took the peach up in both hands, one on each side, and twisted gently until the peach split into two halves, one with the stone still attached. I popped out the stone and then set each half on the cutting board, top side down, so that I could rest the peach on its flattest side. (As a general rule, setting the flattest side of whatever you are trying to cut – assuming it has one! – on the cutting board is the safest way to go.) I then cut the peach, going from bottom to top, into 1/4 inch slices. The result was about six slices per peach, with most of the slices having a hole in the middle, much like a donut. (Kim and I ate the very end slices, which were too thin to grill.)  I grilled the peach slices for about three minutes per side, until they were softened but not falling apart and had some nice grill marks on them.

20140806_Goat Cheese Peach Flatbreads_Diptic1_edited-1

While doing all the above, I was also preheating the oven (and the cookie sheet I had placed in the oven) to 500 degrees. Using a lightly floured rolling pin and working on a lightly floured cutting board, I rolled each of two balls of pizza dough until it was about 10 inches across and about 1/4 inch thick. I used a fork to prick a bunch of holes in the dough to keep it from puffing up in the oven. I – very, very carefully – took the hot cookie sheet out of the oven, laid the dough on the sheet, and put the sheet back in the oven. I cooked the dough for a little less than 10 minutes (the directions on the package of pizza dough said 10 to 15 minutes, but that would have been way too long), at which point the dough was fully cooked and the edges were crisped up nicely. Despite my best efforts, the dough puffed up a lot, but it was pretty simple to just squash it back down.

While the flatbreads were cooking, I dressed the arugula with a little lemon juice, olive oil, salt, and pepper. Once the flatbreads came out of the oven, I started to assemble. I smeared each flatbread with half the goat cheese, which by now had softened nicely, piled on half the arugula, and laid half of the grilled peach slices on top. I sprinkled each flatbread with a little flur de sel (French for “very fancy salt”) to heighten all the flavors and cut each one into four slices using a pizza cutter.

20140806_Goat Cheese Peach Flatbreads_IMG_8591_edited-1

We didn’t know what to expect from this dish, as we rarely make dinners that tend toward the sweet side, but it was awesome. The goat cheese and peaches were sweet but not overly so and were balanced by the peppery flavor from the arugula and the bite from the lemon juice in the salad dressing. While the peaches and cheese were soft, the arugula and especially the crisped up edges of the flatbread gave everything a nice crunch. Since we were using pizza dough, the flatbreads were also nice and chewy at the same time, adding another layer of texture. A very successful experiment for Two at the Table!

20140806_Goat Cheese Peach Flatbreads_IMG_8593_edited-1

Posted in Uncategorized | Leave a comment

Menu for the Week of August 10, 2014

20140810_Menu_IMG_8598_edited-1

Two at the Table_Menu_Week of August 10 2014

We have a fun week planned, with a Yankee game Sunday afternoon and a birthday party to attend Saturday afternoon. We also have a couples cooking class with Chef Maria Reina at the Hilltop Hanover Farm & Environmental Center Friday evening.

Our menu is a little shorter than most weeks, because we figure we’ll have a light dinner the night of the ballgame and the party and eat what we make in the cooking class on Friday. What’s more, Kim has a couple of dinner dates this week, so Tony will be on his own to whip up a one-person dinner.

On Monday night, we’ll make Ina Garten’s Mustard Roasted Fish from her “Back to Basics” cookbook. We still have lots of spinach left over form our trip to Long Island, so we’ll make that along with the potatoes we have left over from the Sheet-Pan Clambake With Mussels, Shrimp, and Chorizo. The fish recipe is not only simple and delicious, but will also allow us to use up the creme fraiche we used to make the Crispy Skinned Duck Breast with a Cherry Sauce and Creamy Spinach and Polenta last week.

Since Kim will be out to dinner on Tuesday, Tony peeked in the freezer to see what he might be able to turn into a simple dinner. He landed on Food Network’s Chicken, Sausage and Peppers, which will let him use up some chicken breasts and Italian sausage we have in the freezer.

On Wednesday, we’re making a new recipe that we saw on Jessica Mechant’s How Sweet It Is blog (www.howsweeteats.com): Cheese Smothered Stuffed Poblanos. The recipe is incredibly easy and we’re making it even easier by using pre-made jasmine rice that we bought from our online grocer, Fresh Direct. We typically don’t take shortcuts like this, but since rice can take a little while to cook and can sometimes be hard to get exactly right, we’re going to make an exception.

Kim will be out to dinner again Thursday night, so Tony took another peek in the freezer and found the chorizo left over from our Sheet-Pan Clambake With Mussels, Shrimp, and Chorizo last week. A quick recipe search turned up Spicy Shrimp and Chorizo Kebabs from “Food & Wine” magazine. Tony will have this with a fun side of roasted corn, red peppers and zucchini, which we also purchased on Fresh Direct.

In addition to the dishes noted above, we’ll also report out on our Friday evening cooking class as well. We’re not sure what we’re making yet, but it should be lots of fun!

Posted in Uncategorized | Leave a comment

Special Feature: Pesto

20140802_Palmiers and Heirloom Tomatoes_IMG_8508_edited-1

If you have lots of left over basil or are just in the mood to make it, pesto is simple and delicious. It’s easy to make (provided you have a food processor) and freezers really well, so you can enjoy it now or later. We usually use Ina Garten’s recipe for Pesto and it has never failed to please. We made the pesto most recently this past Saturday when we had our dinner of Heirloom Tomatoes with Goat Cheese and Savory Palmiers.

The recipe has basically three steps. First, you briefly process together walnuts, pine nuts, and garlic. Next, you puree the nut/garlic mixture together with LOTS of basil, plus some salt and pepper, while drizzling in the olive oil through the feeder tube of your food processor. The last step is to puree in some Parmesan cheese. You may have to play with the salt and pepper to get the pesto to taste the way you like, but that’s all there is to it. You should use it immediately or freeze it in an airtight container; we use freezer bags with the air carefully pressed out. The pesto will keep for a long time, but we usually finish it up within a few weeks of making it, using it to dress pasta, make more savory palmiers, and even to spice up otherwise boring sandwiches.

Posted in Uncategorized | Leave a comment

August 4, 2014 – Salmon and Melting Cherry Tomatoes

20140804_Salmon and Melting Cherry Tomatoes_IMG_iPhone_edited-1

With plenty of heirloom tomatoes left over from the weekend, we decided to use them in Ina Garten’s Salmon and Melting Cherry Tomatoes, a dish we have never made before. Tony describes how incredibly simple it was.

This was definitely one of the easier dinners I’ve ever made. I was cutting the recipe in half, so prep was minimal: I chopped half a cup of Vidalia onion, minced one clove of garlic, and cut one cup of heirloom cherry tomatoes in half. Cooking the onions, garlic and tomatoes was as easy as prepping them. I cooked the onion for five minutes, the garlic for about one minute more, and the tomatoes for about 10 to 15 minutes after that, which was more than enough time to cook the salmon. I made one change at this stage, per Kim’s suggestion. She noticed that one cup of tomatoes really wasn’t enough and that the ratio of onion to tomato was pretty high. We hit on a simple solution and cut up the remaining tomatoes (about another cup) and added them to the pan. Per the recipe, I cooked everything until most of the liquid had evaporated and a sauce had formed.

20140804_Salmon and Melting Cherry Tomatoes_IMG_8580_edited-1

I also deviated from the recipe when I cooked the salmon. Rather than searing the salmon in a pan and then moving the pan to the oven, I just roasted the salmon in the oven and then put it under the broiler for a couple of minutes. This was a very clean and easy approach, but the salmon didn’t come out as crispy on top as I had hoped. I’m always a little leary of using the broiler, as my typical experience tends toward “nothing’s happening, nothing’s happening, nothing’s happening…dammit it’s burned!”, so I usually take things out from under the broiler before I should. No harm done though, as the salmon, while a tiny bit overcooked for our taste, was fine. The tomatoes were the star of the show though. They were soft without being totally mushy and sweet without being cloying. Another great, simple dinner for Two at the Table!

20140804_Salmon and Melting Cherry Tomatoes_IMG_8584_edited-1

Posted in Uncategorized | Leave a comment

August 3, 2014 – Crispy Skinned Duck Breast with a Cherry Sauce and Creamy Spinach and Polenta

20140803_Duck with Cherry Sauce_IMG_8566_edited-1

As planned on our trip to Long Island we purchased some lovely local spinach and duck breasts so that we could make Rachel Khoo’s Crispy Skinned Duck Breast with a Cherry Sauce and Creamy Spinach and Polenta. Every time we go to Long Island, we try to buy a fresh, local duck breast as a treat. Kim is always up for trying a new ways to cook it and this recipe will be making a repeat performance! Kim shares how it went on Sunday night:

As usual, I made half the recipe and since many of the measurements were in grams, I simply used my food scale to measure. (It’s becoming my new favorite kitchen tool – I feel so scientific!)

Since much of the cooking for the polenta and the duck happens simultaneously, I made sure I had all my ingredients ready to go, which for me makes cooking much less stressful and more enjoyable. I also means I can really keep an eye on things.

I began with the polenta and it started to look so tasty right away—even without the spinach and crème fraiche. I was already wishing I had made the whole amount so we could have it for leftovers! It came together very nicely and I was able to keep it warm by keeping in over a burner set to low while I finished up with the duck and the sauce.

For the duck, I scored the skin as suggested and then seasoned it with a special salt we bought in Paris that is infused with red wine—I figured why not since the sauce had wine in it. I used my Le Creuset Dutch oven to cook the duck, which I had used with great success before. This time was no different! Duck is fatty so I was sure to have my splatter screen at the ready. I made a slight modification here as I just didn’t want to have the stove AND the oven on for what was a bit of a hot day. I followed the directions for cooking the duck in the pan entirely as per James Paterson’s Cooking, which was really pretty much Rachel Khoo’s directions, minus the part where the duck goes in the oven.

20140803_Duck with Cherry Sauce_IMG_8562_edited-1

Making the sauce was a lot of fun with all the vibrant, purple-red from the wine and the cherries. We used the Torciano Baldassarre Rosso Tuscano wine from our trip to Tuscany in the sauce and it made it incredibly rich and flavorful.

20140803_Duck with Cherry Sauce_IMG_8554_edited-1

I used nice shallow bowls to be able to nestle the sliced duck into the creamy spinach and polenta and then poured on the cherry sauce. We enjoyed a special dinner in honor of our trip to Tuscany and our Long Island adventure.

20140803_Duck with Cherry Sauce_IMG_8569_edited-1

Posted in Uncategorized | 2 Comments

August 2, 2014 – Heirloom Tomatoes with Goat Cheese and Savory Palmiers

20140802_Palmiers and Heirloom Tomatoes_IMG_8508_edited-1

Tonight, we continued to enjoy all of the great things we purchased on our long-awaited trip to Long Island–especially our favorite fresh goat cheese from Catapano Dairy Farm. We paired it with heirloom tomatoes and used it in Ina Garten’s Savory Palmiers, all which we enjoyed with a 2008 Cuvée from The Lenz Winery in Peconic,  NY. Kim describes how she created a fun, casual dinner.

Making dinner got off to an easy start because my wonderful husband made the pesto for me while I was out having lunch with my friend Cathy and running some errands. Assembling the palmiers is easy, especially when you are only making half the recipe and have such tasty goat cheese to sprinkle in! I used dried sun dried tomatoes that I reconstituted with boiling water and then let soak for a few minutes in olive oil.

20140802_Palmiers and Heirloom Tomatoes_IMG_8512_edited-1

Rolling out the puff pastry to the desired size of 9 1/2 by 11 1/2-inches goes very quickly because I keep a small tape measure in the kitchen to ensure accuracy.

20140802_Palmiers and Heirloom Tomatoes_IMG_8514_edited-1

I got a little overzealous folding and accidentally folded the pastry dough all the way to the middle first instead of only halfway—so I had to refold, which admittedly was sort of tricky. The result was my palmiers looked a little more squished than I would have liked but my hope was that they would still be delicious (they were).

20140802_Palmiers and Heirloom Tomatoes_IMG_8527_edited-1

20140802_Palmiers and Heirloom Tomatoes_IMG_8534_edited-1

Just before putting the palmiers in the oven, I sliced the heirloom tomatoes from Long Season Farms, drizzled them with a little olive oil, and sprinkled on some fleur de sel and freshly ground pepper. In the middle of the platter, I placed a wheel of the Catapano Dairy Farm three-herb goat cheese. Keeping with the savory theme, I also got out a variety of olives (Cerignola, Gaeta, and Kalamata) as an accompaniment.

20140802_Palmiers and Heirloom Tomatoes_IMG_8518_edited-1

The palmiers filled the apartment with a wonderful aroma and we sat down to a delicious dinner with local favorites from Long Island paired with the aforementioned 2008 Cuvée sparkling wine from The Lenz Winery purchased on our trip in April.

We finished our delightful dinner with a slice of Briermere Farms peach cherry pie with a dollop of fresh made whipped cream sweetened with little sugar and flavored with a touch Madagascar bourbon vanilla extract.

A Note about the Goat

20140727_Kim and Goat_edited-1

The last time we visited Catapano, Kim got to hold a two-day-old baby goat, which you can see in the picture above. The goat had been abandoned by her mother, so the staff at Catapano was giving her lots of extra love and attention. We’re happy to report that the little goat is doing fine. She’s a little smaller than the other goats born this spring, but she is happy and healthy and as cute as ever!

Posted in Uncategorized | 1 Comment

Special Feature: A Little More About Us, Continued

We’ve gotten a few questions about us from our readers, so we thought we would field those periodically. We’ll mix the Q’s & A’s in with our usual posts and also add them to our “About Our Blog” page.

20140727_Cookbooks_IMG_8427_edited-1

Q: Where do you get your recipes?

A: Several places. We have quite a few cookbooks (as you can see in the photo above), so we often page through those and highlight things that sound good. We don’t watch a lot of cooking shows, but we do watch Rachel Khoo and Ina Garten, so we often get ideas from them that we look up in their cookbooks. We subscribe to “Food & Wine”, which is a great source for recipes, as is the “New York Times” Dining section, which comes out every Wednesday. Kim has found some great recipes in “Real Simple” and Tony has found some in “Esquire” and “GQ”. We also subscribe to few e-mail lists that we find very helpful: Tasting Table, “Saveur” (though we don’t subscribe to that magazine), and “Food & Wine”. We follow quite a few people on Twitter and Instagram, which is another great source for recipes. We try to save all the recipes that we find electronically to Evernote; at last count, we had 1,153 recipes saved, covering breakfast, lunch, dinner, and all sorts of snacks in between! If we have a specific dish we want to make, but can’t find a recipe in one of the sources noted above, we’ll either visit the Food Network website or just Google a recipe for the dish.

Posted in Uncategorized | 1 Comment

Menu for the Week of August 3, 2014

20140803_Menu_IMG_8517_edited-1

Two at the Table_Menu_Week of August 2 2014

We have dinner plans for later in the week, but we still have lots of wonderful produce and cheese (and even duck!) from Long Island to enjoy, so we’re excited to jump into another week of cooking!

Kim has a very special dinner planned for Sunday night: Rachel Khoo’s Crispy Skinned Duck Breast with a Cherry Sauce and Creamy Spinach and Polenta. Duck can be a little intimidating (it’s very fatty, so it’s easy to burn), but Kim has had great success making it before and this recipe seems even easier than others we’ve tried. We’ll enjoy the duck with one of our bottles of Torciano Baldassarre Rosso Tuscano.

We bought a lot of heirloom cherry tomatoes during our recent trip and found the perfect recipe for them for Monday night: Ina Garten’s Salmon and Melting Cherry Tomatoes. (Please note that the link will take you to a review of Ina’s Foolproof cookbook, with the recipe, on the Calgary Herald website.) We’ll pair this with an Italian white wine, Bastianich Friulano.

On Tuesday, we’re going to use up the remaining goat cheese and heirloom cherry tomatoes make something simple: Tomatoes and Goat Cheese with Garlic Toasts, a dish inspired by Ina Garten’s Tomatoes & Burrata with Garlic Toasts. This dish involves minimal cooking – all you need to do is toast the bread and if you have the patience to stand over the toaster, you don’t really need the oven to do that – which makes it perfect for summer. We’ll probably finish the Torciano with dinner tonight.

We still have some leftover baby Yukon gold potatoes from last week, so we’re going to do a mash-up of recipes to use them. Tony found a fun recipe on the Bon Appetit website for Crispy Salt-and-Vinegar Potatoes, which he thought would make a great side dish but would make for a pretty boring dinner on their own. Enter Kim, who found a Martha Stewart recipe for Warm Spinach Salad with Fried Egg and Potatoes. The plan is to cook the potatoes according to the Bon Appetit recipe and use them in the Martha Stewart salad recipe. The rest of the white from Tuesday should pair nicely with this dish

On Thursday night, we say good-bye to the last of the goat cheese (did we mention we bought a LOT of goat cheese?) with a recipe of our own creation: Flatbreads with Wildflower Honey Goat Cheese, Arugula and Grilled Peaches. We plan to use pizza dough we have in the freezer as the base for this dish and to dress it up with the wildflower honey goat cheese and some arugula for a little bit of bite. We’re also going to grill some of the peaches we bough on Long Island. This will be an experiment for us; we’ll let you know how it turns out!

Posted in Uncategorized | Leave a comment

August 1, 2014 – Sheet-Pan Clambake With Mussels, Shrimp, and Chorizo

20140801_Clambake with Corn_IMG_8477_edited-1After a fun Friday on Long Island and a stop at the Southold Fish Market on the way home, we revisited Real Simple’s  Sheet-Pan Clambake With Mussels, Shrimp, and Chorizo. Unlike the last time though, we paired it up with fresh corn on the cob, which we bought at Long Season Farms, one of the many farm stands that dot the main road to Greenport, NY. Tony describes how he made the dish this time.

We were excited to have this dish again, especially since we were able to get so much fresh seafood. The basic steps were the same as the last time, but we did use some different ingredients. The first time I made this dish, I used a large Yukon gold potato that I cut into pieces. This time, I was able to get a bunch of baby Yukon gold potatoes, which is what the recipe calls for. I also used a different kind of chorizo, one made by Hudson Valley Harvest using local heritage pork. I cooked the potatoes and chorizo together for about 25 minutes. This turned out to be the perfect amount of time for the potatoes, which came out very tender, but a little too long for the chorizo, which came out a little dry. I plan to cut the cooking time back to 20 minutes the next time I make the clambake, which should still be enough time for the potatoes to cook fully, since they are so small.

While the chorizo and potatoes were in the oven, I put a pot of salted water on to boil for the corn. I didn’t want to over cook the corn and left to my own devices, I’m sure I would have. Thankfully, we found a simple recipe on epicurious (www.epicurious.com) that calls for dropping the corn into a pot of boiling water, putting the lid on the pot, bringing the water back up to a boil (which took all of 2 or 3 minutes), and then turning off the heat. At this point, you can leave the corn in the pot for another 15 minutes. The timing of this worked out perfectly: the water took about 25 minutes to boil, the same time as the chorizo and potatoes did to cook, and the 15 minutes that the corn sat in the water was more than enough time to cook the seafood.

20140801_Clambake with Corn_IMG_8470_edited-1

As for the seafood, while I used the same things as last time, the proportions were very different. Last time I used 2 pound of mussels and half a pound of clams, while this time I stuck to the recipe and used a pound of each. (As usual, I was halving the recipe.) I also used jumbo shrimp, instead of large shrimp. This meant that I only had four really big shrimp in the mix, versus over a dozen large ones last time. It would have been nice to have a couple more, but they were so large, it worked out fine. As before, I cooked the clams on their own sheet pan and mixed the mussels and shrimp in to cook with the chorizo and potatoes (plus butter and Old Bay seasoning). After fifteen minutes in the oven the final step was to mix everything together, sprinkle on some parsley, and serve.

20140801_Clambake with Corn_IMG_8472_edited-1

All of the seafood was perfect – the clams were plump and juicy, the shrimp was firm but not tough, and the mussels were flavorful and not overdone. The corn, which we smeared with butter and sprinkled with salt, was sweet and not the least bit soggy. We paired dinner up with the Greenport Harbor Brewing Company’s (harborbrewing.com)  Otherside IPA (India Pale Ale), which we purchased at their new brewery in Peconic, NY.

20140801_Clambake with Corn_IMG_8484_edited-1

Posted in Uncategorized | 1 Comment

July 31, 2014 – Honey-Chili Chicken Thighs with Creamy Cilantro Sauce and Spicy Grilled Corn

20140729_Honey Chili Chicken Thighs_IMG_8456_edited-1

Tonight, we combined two recipes into one meal, making the kitchn’s (www.thekitchn.com) Honey & Chili Chicken Thighs with Creamy Cilantro Sauce and Melissa D’Arabian’s (www.melissadarabian.net) Spicy Grilled Corn. Tony describes how he did it:

Kim has made the honey and chili chicken thighs dish before, but I hadn’t, so I didn’t realize how easy it was. There are basically three steps: 1) marinate the chicken, 2) make the sauce, and 3) cook the chicken.

The marinate step is very simple, because while there is some measuring involved (honey, chili powder, beer, and so forth) there is very little chopping to do, especially if you skip using the cilantro as garnish. It took me maybe 10 minutes from the time I got a large bowl out of the cupboard to when I put that same bowl, now with marinated chicken in it, into the fridge. The best part was that since I was cutting the recipe in half, I only needed to use 1 ounce (or 1/8 of a cup) of beer to marinade the chicken, leaving 11 ounces with which to marinade myself…

The cilantro sauce may seem intimidating at first, but it is just as easy as the marinade: everything goes into the food processor and gets blended together until it is smooth. You may have to adjust the taste a bit, but that’s about all there is to it. If you are patient and are willing to put in the time to chop the cilantro very, very finely, I think you could make this sauce even without a food processor – but it would be much, much harder!

The last step, cooking the chicken, is the easiest step of the three. The chicken just goes into a 450 degree oven for 25-30 minutes until it reads 165 on a meat thermometer.

While the corn isn’t part of the chicken recipe, we thought it would be a great accompaniment. This is another simple recipe. The only trick is to remember to take the butter out of the fridge before you need it; I took it out along with the chicken. If the butter has a chance to soften, it will, of course, be much easier to work with. I mixed the paprika and red pepper flakes, plus salt and pepper, into the butter, then spread the butter all over each ear of corn. (You can see what this looks like in the photo above.) I wrapped each ear in a piece of aluminum foil and put it on a pre-heated grill pan and let it cook for the same amount of time as the chicken, turning it every five minutes.

Everything about this dinner was great. The chicken was moist and flavorful and cooked perfectly. The corn – which, after the first time we had it, is pretty much the only way we make corn – was rich and spicy without being too hot. The star of the show, however, was the cilantro sauce. It gave depth to the chicken and was a nice, cool balance to the corn. (I put it in a squeeze bottle and after I had finished my dinner, I kept squirting a bit onto my finger and licking it off.) We’re going pair these chicken and corn dishes a lot while corn is in season – we hope you will too!

20140729_Honey Chili Chicken Thighs_IMG_8462_edited-1

Posted in Uncategorized | 2 Comments