January 4, 2015 – Anniversary Dinner: Lasagna with Meat Sauce

20150103_Torciano Wine 120150103_Torciano Wine 2

When we took our trip to Tuscany this past May, we visited the Tenuta Torciano vineyard in San Gimignano, where we enjoyed a fabulous wine tasting and lunch. The main course at lunch was a fantastic lasagna with Bolognese sauce, made from Mamma Torciano’s recipe and served with a drizzle of truffle oil. It was so good, that it not only inspired us to try to make it ourselves, but as we thought about what a wonderful dinner it would be to make and share, it also gave us further encouragement to launch Two at the Table. The lasagna was paired with a number of red wines, but the one that stood out the most was a the 2006 Terrestre. This wine was waaaay out of our usual price range, but we figured, “Who cares? We’re on vacation!”. Plus, we thought it would be a lot of fun to enjoy it again at home, ideally on our fifth anniversary.

When the wine arrived several weeks after we got home from our trip, we realized that storing it in our little wine rack in the corner was not the best way to treat such a special wine. We then remembered that our friends Tom and Sharon had not one, but two wine fridges, one for whites, one for reds. A plan began to take shape: in exchange for keeping our precious wine safe from curious kitty cats and at the right temperature, we would have Tom and Sharon over for dinner, when we would try our hand at making the lasagna. Tom and Sharon thought this was a great idea, so we settled on the first Saturday in January, partly because this is definitely a weekend dish, but mostly because that day was about halfway between their first anniversary and our fifth.

So, with all that as background, we set on making Torciano’s Lasagna with Meat Sauce on Saturday. (Please note that the link will take you to all the recipes you need for this dish, including home-made pasta, if you’re felling super-motivated!) Tony took the lead; here’s what he did:

I’ve made lasagna many times before but this time was going to be different, for two reasons. First, I was using fresh pasta, which we purchased at Chelsea Market’s Buon Italia. (We plan to buy a pasta making attachment for our stand mixer so that we can play around with making our own pasta, but store-bought seemed to be the way to go this time.) Second, I was going to follow the Torciano recipe and make a béchamel sauce; every time I’ve made lasagna in the past, I’ve used ricotta. I’ve made a béchamel sauce (basically a mixture of butter, flour, and milk) before, specifically for the Chiptole Mac and Cheese I brought to my office’s holiday pot luck lunch, so this was a not entirely new technique, but this was the first time I was going to make it for a lasagna.

My plan was pretty simple: first make the Bolognese sauce, then make the béchamel sauce, and finally assemble the lasagna, which I would put into the fridge until I was ready to start baking it. Since there was a lot to do and we wanted to have dinner at a reasonable time, I worked backwards from our planned dinner time of about 8:15 to figure out when I needed to start each step. (Kim got me into this habit and it’s critically important if you’re making a complex dinner and don’t want to eat it at 10:00 p.m.!) The lasagna needed 60 minutes to cook and 15 minutes to cool, so an 8:15 p.m. dinner meant the lasagna had to go into the oven at about 7:00 p.m. I gave myself an hour to assemble it (boiling the noodles, making the layers, etc.), so I figured I should be starting that at about 6:00 p.m. The Bolognese sauce take about three hours (about half an hour to prep and two-and-a-half hours to cook), so I wanted to start the sauce at 3:00 p.m. I figured the béchamel would only take about 30 minutes, so I thought if I started that at 5:30 p.m., just before the Bolognese sauce was done, I would be in good shape.

The prep for the sauce was pretty easy: I just diced some onion, carrot, and celery and that was it. I sautéed the veggies in olive oil over medium heat in our Dutch oven for about 10 minutes, then added the ground beef, which I cooked for about 15 minutes more. There was a lot of olive oil and rendered fat from the beef in the pot after this step. The recipe doesn’t say to drain any of it off, so I didn’t. I didn’t think the sauce was too oily despite leaving in the oil and fat, but you can drain it off it you want to. I next added the tomatoes and tomato paste, brought the mixture to a boil, and then simmered for two hours, uncovered, stirring occasionally, as the recipe directs.

At about 5:30 p.m., I started on the béchamel sauce. I knew this was going to be tricky, because it involves cooking things that are very easy to burn–butter and flour in one pot and milk in another. The key was to work at fairly low heat and to stir everything constantly. I started by putting a quart of milk in our small, heart-shaped, Dutch oven over medium heat so that I could scald it (that is, get it just short of boiling). While the milk was heating, I melted a stick of butter in a sauce pan and added 3/4 cup of flour. To avoid clumps, I first sifted the flour into a bowl using a small strainer and then poured the sifted flour back through the strainer and into the pot with the butter. I think this, plus the constant stirring, was the key to avoiding lumps in the sauce. I kept stirring until the milk got to the right temperature, which took about 10 minutes, and then added the milk all at once to the butter-flour mixture and stirred like mad until it had reached the right consistency. I added the salt, pepper, and nutmeg at this stage and let the pot sit. (Nutmeg isn’t exactly a traditional Italian spice, and probably one my very Italian Mother has never heard of, but it is a key to this dish.)

I did make two mistakes at this stage, one small and one larger. I should have put the milk on to scald a little soon than I did; this would have saved me at least a little bit of stirring. I also waited until the Bechamel sauce was done before putting the water for the pasta on to boil. I should have just put the pot on a back burner and then moved it to the front when I was done with the pot I was using for the milk. This wasn’t a disaster, but it did mean that the Béchamel got a little thicker than it should have been, because it had too much time to cool. I tried to address this by stirring a little more milk to the sauce, which helped, but eventually, I had to worry about boiling noodles and assembling the lasagna and didn’t want to have to deal with string the sauce. Not a big problem, but better timing would have help make the sauce easier to work with.

The pasta we were using came in fairly large sheets (about the size of an 8 1/2 inch x 11 inch sheet of paper), so I cut these in half so that I was working with pieces that were about 4 inches by 5 inches. I put two of these into the pot at a time and boiled them for only one minute, which turned out to be just the right amount of time. I scooped the pasta out of the water using the same little strainer I used for the flour, put it in a colander, and ran cold water over it. When the pasta was cool enough to handle, I picked it up gently, let a little water drain off, and then laid it on a stack of paper towels, flipping it once to blot off some of the water.

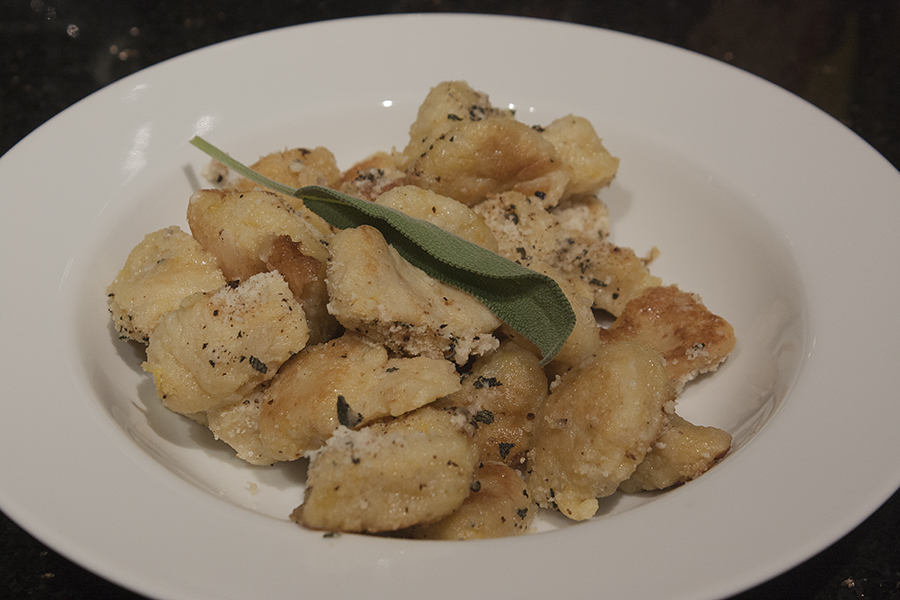
As the first batch of pasta was boiling, I had sprayed a lasagna pan with cooking spray, spread out a layer of Bolognese sauce on the bottom of the pan, and sprinkled some Pecorino cheese on the sauce. I laid the pasta on the Bolognese sauce (unless you cut them perfectly to size, the pieces will overlap, but that’s fine) and spread the Béchamel sauce over the pasta. I repeated the is pattern–Bolognese, Pecorino, noodles, Béchamel – four more times until I had a five-later lasagna and just enough Bolognese left over to serve over the lasagna. At this point, it was only 6:30 p.m.: I was a little ahead of schedule so I just covered the lasagna with foil, put it into the fridge, and Kim and I cleaned the vast array of pots and pans I has used to get to this point.

At exactly 7:00 p.m., I put the lasagna into a 375 degree oven, where it cooked covered for 45 minutes and then uncovered for 15 minutes more. Shortly after 7:00 p.m., our guests Tom and Sharon arrived with a lovely bottle of Veuve Clicquot, which we enjoyed with a simple antipasti platter (ordered from Fresh Direct to save on anxiety) of three kinds of Italian olives, marinated artichokes, grilled mushrooms, and caper berries.

I took the lasagna out of the oven and let it rest for 15 minutes, which allowed it to cool slightly and made it easier to cut. We served the lasagna with Bolognese and grated Pecorino on top and plated it with a green salad. When we had this dish at Torciano, it was served with a drizzle of truffle oil. We ordered a bottle of the truffle oil when we ordered the wine, so we were also able to replicate this part of the experience too.

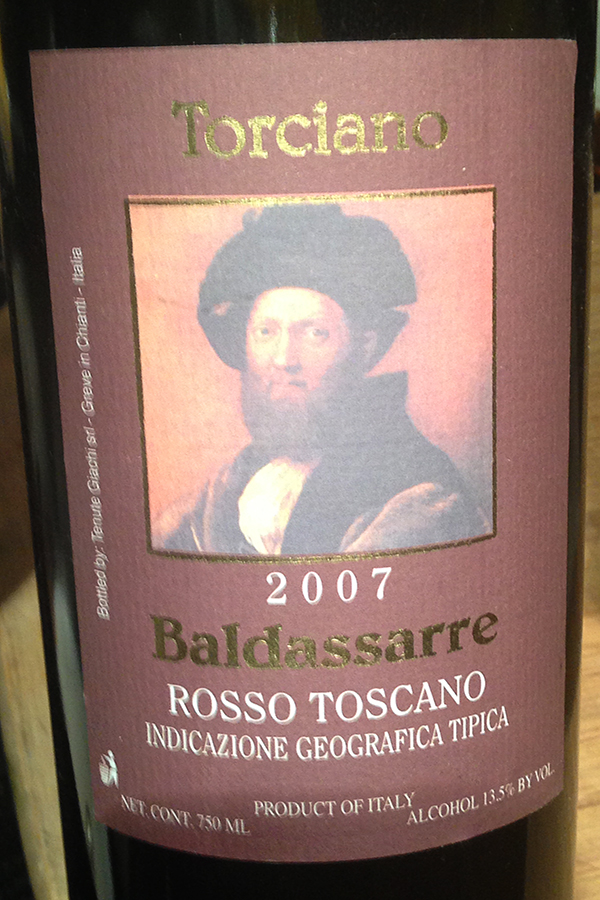
The lasagna turned out great–maybe not as good as Mamma Torciano’s but absolutely delicious. The pasta was cooked perfectly, not quite al dente, but not too soft either. The Bolognese was thick with lots of flavor from the veggies. The Béchamel gave everything a nice creaminess and was a huge step up from the ricotta I’ve used in the past. The lasagna paired perfectly with the wine, which was bold and fruity and more than a match for this heavy, rich dish. (We opened a second bottle too, a 2007 Torciano Baldassarre, which was not quite as good as the 2006 Terrestre, but still very good.)

We finished the night with several rounds of an Italian card game called Seven and a Half and then enjoyed some almond cantucci (small biscotti) and a little Vin Santo as is the custom in Tuscany.

Our anniversary dinner was wonderful and more than worth the effort that went into it. We have a busy work week ahead, so it will also be nice to have some leftovers to fall back on. There’s even enough to bring some for lunch one day this week too!

Posted in Uncategorized | 2 Comments

January 1, 2015 – 4th Annual New Year’s Indoor Barbecue

20150101_Brisket_IMG_8954 copy

Two at the Table_New Year’s Indoor Barbecue Menu

Having grown up mostly in Texas, Kim is very familiar with the Southern tradition of eating black-eyed peas (for luck) and collard greens (for prosperity) on New Year’s Day. Not only have we made one or both of those dishes every January 1 since we got married, we’ve also built on those dishes and created our own tradition of a New Year’s Day Indoor Barbecue. (Aside from having no outdoor space, it’s pretty cold in New York in January!) This was the second year that we invited our friends Sharon, Tom, Alexandra, and Eric (who, unfortunately, was too sick to attend, but did get a to go plate!), so we really wanted to do things up.

Kim’s parents gave us a copy of Lisa Fain’s “The Homesick Texan’s Family Table” for Christmas. Lisa, like Kim, is a transplant to New York City from Texas and has found ways to make her favorite dishes from Texas in her small apartment. We are huge fans of Lisa’s original cookbook, “The Homesick Texan Cookbook,” and we are very excited to jump into the new one.

We decided to do a Homesick Texan-themed barbecue this year and made everything (with the exception of the celery sticks, tortilla chips, and wine!) from scratch. We mostly  used recipes from “The Homesick Texan Cookbook”, but used one recipe, for corn sticks, from Lisa’s newer book. Here is the menu below, with links (Please note that while the links take you to recipes very similar to what we made, if you want the exact recipes, you have to buy Lisa’s cookbooks!):

Chipotle Pimento Cheese

Coffee-Chipotle Oven Brisket, served with Coffee-Chipotle Barbecue Sauce

Texas Caviar

Jalapeño Corn Sticks

Kim made Chipotle Pimento Cheese, a Southern appetizer staple with a Texas twist with the addition of cilantro and chipotle.  Here’s how it went for Kim:

20150101_Pimento Cheese_IMG_8973 copy

This was my second time making this recipe and I was I really glad I did! It came together so quickly and can be made a little in advance, which really helped with the timing of all the other delicious things that needed to be made. I started by grating the cheese and then the little bit onion. I then added the remaining ingredients–garlic, mayonnaise, pimentos, chipotle in adobo, cilantro, cumin and lime juice–and mixed gently.  I picked a nice-sized chipotle to add, so the cheese had a nice kick and only needed a touch of salt and pepper to come together. I transferred the concoction from the mixing bowl to a serving bowl, covered it with plastic wrap and into the fridge it went. Just before our guests arrived, I took it out of the fridge and arranged it on a platter with celery sticks and tortilla chips, as per tradition. Thanks to our friends at Wines by the Flask, we paired this with a  2013 Claudio Morelli Bianchello del Metauro that was delightful and really balanced the creaminess of the cheese.

Tony’s main contribution to dinner was the Coffee-Chipotle Oven Brisket and the Coffee-Chipotle Barbecue Sauce. Here’s how he made them:

20150101_Brisket_IMG_8950 copy

The first step for preparing the brisket was to put together the rub, which is a mixture of salt, pepper, and other tasty spices and took me no time at all to make. Once the spice mix was ready, I rubbed it on both sides of the brisket until the meat (and my hand!) was well coated. I laid the brisket on a large piece of foil and draped the bacon across the top, then spread the onions and garlic on top of the bacon. I wrapped the brisket in the foil and then wrapped it with a second piece if foil. I placed the packet of meaty goodness into a 325 degree oven where it cooked for the rest of the morning and part of the afternoon. After a 20 minute rest, the meat came out of the foil and was perfect – very tender and juicy, not only from the fat of the brisket itself, but also the bacon, with the spices in the rub all coming through. Thanks to our friends at Wines by the Flask, we paired the brisket with a 2012 Torcicoda Primativo, which stood up very well to the bold flavors in the meat and barbecue sauce. (Tom and Tony stuck to the Shiner Bock the drank with the pimento cheese!)

20150101_Brisket_IMG_8982 copy

The barbecue sauce is one of my favorite recipes from either of the Homesick Texan cookbooks. It’s such a unique spin on the usual sauces that I have been known to squeeze some into a spoon and just eat it by itself. It’s very easy to make, as all you need to do is sauté some onion and garlic, add all the wet ingredients (including coffee) and dry ingredients to the pot, and let everything simmer until all the flavors have married and the sauce has thickened. The sauce came out perfectly, with enough sweetness to complement the savory meat and enough heat (and caffeine!) to open your eyes.

Kim always makes something with black-eyed peas for New Year’s Day and this time it was Texas CaviarHere’s how it went:

20150101_Texas Caviar_IMG_8960 copy

It had been a few years since I had made Texas Caviar. I had never made Lisa Fain’s recipe and I was excited to try it. I was also very glad that it had to chill for four hours–it meant I could make it well in advance and not have any last-minute things to worry about. Just before Christmas, I was lucky enough to find canned black-eyed peas at my local grocery story–normally I have to import them from Texas–and scooped up two cans and stashed them away for this very occasion. I love the colorful mix in this dish; the green from the scallions and cilantro, the red from the tomatoes and the yellow from the bell pepper really look spectacular against the black-eyed peas. The lime juice, which gets added to the above ingredients along with olive oil and cumin, added a nice brightness to the dish and while it was very tasty as I put into the fridge, it was even better when I took it out and served it with the brisket.

20150101_Texas Caviar_IMG_8967 copy

Last but not least, we knew we wanted to serve some cornbread, so Tony, after investing in a pair of beautiful, cast-iron cornstick pans, made Jalapeño Corn Sticks. Here’s how he did it:

20150101_Cornsticks_IMG_8975 copy

The plan for the corn sticks, which are very similar to cornbread, was to mix the batter and bake them which we were letting the brisket rest. For me, this first meant measuring out the dry ingredients (cornmeal, flour, baking soda and baking power, plus jalapeños) in the morning. When the brisket came out of the oven, I mixed together the wet ingredients (egg, buttermilk, and vegetable oil) and combined them with the dry to make the batter. The batter, as the cookbook notes, is very thick; it’s almost closer to a dough than a batter. I used a very small rubber spatula to spoon the batter into the wells of the cornstick pan and to smooth the top of the batter so that it filled each well. The sticks baked for 15 minutes (I turned each of the pans halfway through the cooking time so that the tops would brown evenly) and came out golden brown on top and rich yellow on the bottom. Like everything else, the corn sticks were perfect – moist (and warm!), with just a little spiciness from the jalapeños. With this last dish made, dinner was served!

20150101_Cornsticks_IMG_8979 copy

For dessert, we were lucky enough to have an assortment of home-made Christmas cookies that Kim’s mom was nice enough to send home with us when we returned from Austin after the holiday. We had raspberry jam bars, peanut butter blossoms, snowballs, ginger molasses cookies, and caremelitas, which were everyone’s favorite.

So, we rang in the New Year with a perfect combination of close friends; delicious food, thanks to Lisa Fain at the Homesick Texan; and great wines, thanks to our friends at Wines by the Flask. This hugely successful dinner will set the tone for 2015 and we look forward to writing about more of the great dishes that we make this year at Two at the Table!

Posted in Uncategorized | 1 Comment

December 30, 2014 – Garlicky Kale-and-Provolone Grinders

20141230_Garlicky Kale Sandwiches_IMG_8949 copy

We wanted something quick and easy for dinner Wednesday night and decided to make Food & Wine’s Garlicky Kale-and-Provolone Grinders. Here’s how Tony did it.

There’s minimal prep involved with these grinders, as all you need to do is tear the kale into large pieces and mince the garlic. If you’re using the garnishes (and you should!), you’ll also need to slice up some radishes and olives. I added my own twist to this dish by substituting olive bread for the ciabatta. I thought it would be nice to toast the bread a bit, so I brushed one side of each piece with olive oil and put the bread under the broiler for a couple of minutes. Keeping one side untoasted made it easier to spread the mayonnaise and arrange the radishes slices and olives later on.

The cooking involves with this dish is pretty minimal too. I sautéed the anchovies, garlic and kale together for about 3 minutes until the kale was soft. (You can leave the anchovies out if you like, but they do add a lot of flavor.) I added a cup of water (we were halving the recipe, which calls for two cups), covered the pan, and cooked for about 15 minutes until the kale was nice and soft. I layered five slices of provolone on top of the kale, covered the pan, and cooked for 2 more minutes to melt the cheese.

The final step was top assmeble the sandwiches. I laid the bread tasted side down not he cutting board. For each sandwich, I spread the untoasted side of one slice of bread with mayonnaise.  I put half of the olive slices on each piece of bread and then spread out half of the radish slices over the olives. I used a slotted spatula to transfer the kale with cheese out on the pan an onto the untoasted side of other slice of bread. I then very carefully put the sandwiches together.

As you can see from the photo above, the sandwiches were very pretty – brown and toasty on the outside and lush, dark green on the inside. The kale was cooked perfectly: not too bitter and not too soft. The flavor of the anchovies came through without being overwhelming and the creamy, melted cheese was a nice counterpoint to the crisp, toasted bread – and the crunchy potatoes chips!

The anchovies in this dish almost stumped our friends at Wine by the Flask, but they directed us to a wine we had never had before: a 2012 Cuvee Marie Juracon Sec. The wine was a little bit acidic and a little bit minerally and a perfect match for the bold flavors of this dish.

Posted in Uncategorized | Leave a comment

December 29, 2014 – Indonesian Grilled Swordfish with Sesame Stir-Fried Chinese Greens

20141229_Indonesian Swrodfish_IMG_8940 copy

If you follow our blog, you know that we don’t make many Asian-inspired dishes. We decided to try two new ones on Monday: Ina Garten’s Indonesian Grilled Swordfish and Ellie Krieger’s Sesame Stir-Fried Chinese Greens. Here, Tony describes how the two dishes came together.

The first step in the dish is to prepare a marinade and let the swordfish sit in it overnight. We debated whether to do this at all – it seemed like an extra, unnecessary step – but we are very glad we did. It was very easy and gave the fish a tremendous amount of flavor.

To make the marinade, I just combined the soy sauce, canola oil, lemon zest, lemon juice, ginger, garlic, and mustard. I poured half the marinade into a glass dish, laid the fish on top, and poured the rest of the marinade over the fish. Part of why I didn’t want to make the marinade is that I wasn’t anxious to mince up about 1/8 of a cup of ginger. Then I hit on what turned out to be a great idea: I peeled the ginger, which we keep in the freezer, and then grated it on a microplane. This took maybe a minute or two to do, and basically produced ginger “snow”, which was grated super fine.

20141229_Indonesian Swrodfish_IMG_8937 copy

Cooking the swordfish was even easier than prepping it. I cooked it on a grill pan over medium heat for about three minutes per side. The fish needed to sit covered (tightly) in foil for about 10 minutes, which was plenty of time to make the greens.

The recipe calls for baby bok choy, but we were only able to get the regular kind, so I needed to cut it up into pieces. I cooked the bok choy over high heat in a non-stick pan for about 2 minutes, then added soy sauce, vinegar and sesame oil and cooked it for about 2 minutes more. At this point, the fish was done resting, so I plated everything, sprinkled some sesame seeds on top, and we were ready to eat.

The fish was cooked perfectly and super flavorful. I think the ginger, because it was grated so fine, really had a chance to permeate the fish, but the other flavors came through too. The bok choy was also cooked just right: softened, but still very crunchy. We paired this with a 2012 Heinz Nicolai German Riesling, which our friends at Wines by the Flask (www.winesbytheflask.com) recommended. It was somewhere between slightly sweet and slightly dry, with a touch of minerality, and was a perfect complement to our dinner.

Posted in Uncategorized | Leave a comment

December 28, 2014 – Brussels Sprout, Bacon and Gruyère Frittata

20141228_Bacon and Brussels Sprouts Frittata_IMG_8934 copy

We changed gears a little bit and decided to make the Brussels Sprout, Bacon and Gruyère Frittata for lunch on Sunday, rather than for dinner. Tony describes how he made it.

As I usually do, I started with all the prep work for this dish. We bought pre-shredded brussels sprouts, which saved a tremendous amount of time; I’m not sure I would have tackled this recipe if I had to do all of that slicing by hand. With that done, all that was left to do was dice the bacon, slice the shallots, grate the cheese, and chop up the chives. All of this took about 10 or 15 minutes. I also prepared the egg mixture by combining eight eggs with a little milk and salt and pepper. The recipe says you can do this step while the other ingredients are cooking, but I wanted to get that step out of the way.

Once all this was done, I cooked the bacon in a skillet, which took about 5 minutes, as called for in the recipe. I added the shallots and cooked them for about 3 minutes, again as called for in the recipe. As the last step, I added the brussels sprouts. I probably cooked these for 7 or 8 minutes, which is a little longer than the recipe’s instructions, but I wanted to make sure they were soft. Plus, it took a little while to get them browned.

I then added the grated cheese and chives to the egg mixture and stirred everything together to combine. I poured the eggs into the skillet and let them cook, stirring just enough to spread out the bacon and brussels sprouts. I did this all over fairly low heat, as I didn’t want to burn anything, so this step probably took a total of 9 minutes, versus the recipes 5 minutes, as I needed a little more time to make sure the eggs were not too runny before putting them under the broiler. I put the pan under the broiler and after about 2 1/2 minutes, the eggs has set nicely and browned just a little.

I was a little nervous about getting the frittata out of the pan (I didn’t want to end up making scrambled eggs by default!), but after running a flat rubber spatula around the edge of the fritatta a couple of times and also sliding it toward the center, the frittata slid out of the pan without too much trouble.

The fritatta came out perfectly – light and fluffy and, despite having half a pound of bacon in it, not very greasy at all. The brussels sprouts were nice and soft and the Gruyère added an earthy note. My biggest concern about this recipe was that either the bacon or brussels sprouts would overwhelm the dish, but everything was in perfect balance. We had the frittata with brioche buns and a little Pinot Grigio, because we figured, we’re still technically on Christmas vacation, so why not have wine with lunch!

Posted in Uncategorized | 1 Comment

Menu for the Week of December 28, 2014 – Part 1

Two at the Table_Menu_Week of December 28 2014_Part 1

Now that the holidays are (almost!) over, Two at the Table is getting back into the swing of things. We have a few special dinners planned for later this week, so our menu is coming out in two parts. Part 1 covers Sunday, Monday and Tuesday. These are our regular dinners, though we are trying three new recipes this week. Part 2 will cover Thursday (New Year’s Day), Friday and Saturday. On New Year’s Day, we’re having our friends Alexandra, Sharon, Eric, and Tom over for our annual New Year’s Day Indoor Barbecue. On Saturday, we’re planning to have Sharon and Ton over again to celebrate our anniversaries: their first, our fifth.

On Sunday night, we’re making Food & Wine’s Brussels Sprout, Bacon and Gruyère Frittata, which will be Tony’s first attempt at making a fritatta. This one is a little different than other frittatas we’ve made, as it finishes cooking under the broiler, rather than just going into the oven. It makes six servings, so we should have enough left over to make some nice breakfasts this week.

On Monday night, we’re doing something very different for us and make two recipes that feature Asian flavors. The first recipe is Ina Garten’s Indonesian Grilled Swordfish. We picked this one because swordfish was pretty highly rested on Fresh Direct. We’re going to pair this up with Ellie Krieger’s Sesame Stir-Fried Chinese Greens, which should be a nice accompaniment.

On Tuesday night we’re going to do something we don’t do to often for dinner and make sandwiches. Specifically, we’re going to make Food & Wine’s Garlicky Kale-and-Provolone Grinders. We picked this dish mostly because it will feed (quite literally) Tony’s obsession with kale, but also because it will be relatively quick and easy. It has the added benefit of allowing us to use a loaf of delicious olive bread that we purchased on our last trip to Greenport, Long Island and that has been waiting to be put to good use for a while.

So that’s Part 1 of this week’s menu. Check back on Tuesday to see the menu for the rest of the week including our special New Year and Anniversary dinners!

Posted in Uncategorized | Leave a comment

September 28, 2014 – One-Pot Herb Roasted Chicken with Butter Toasted Wild Rice

We made this again on Sunday, and it was every bit as good as we remembered. This being the second time making it, it was a little easier, and well-worth the time it takes!

kimtony123's avatarTwo at the Table

20140928_Herb Roasted Chicken with Wild Rice_IMG_8790_edited-1

We made Half Baked Harvest’s One-Pot Herb Roasted Chicken with Butter Toasted Wild Rice a few weeks ago, but as we haven’t stopped thinking about it since then, we needed to write it up and share how much we enjoyed it. Here’s what Tony did:

Before I start, I just have to say how unbelievably good this dish was. We were expecting a nice, comforting meal, but I swear this dinner actually gave us a hug. It is only a slight exaggeration to say I’ve thought about this dinner every day since we made it. It’s very simple to make, but the flavors are really complex and very well-balanced. You get earthy from the mushrooms, nutty from the wild rice and orzo, and sweet from the carrots, onion, and brown sugar. All of this is combined with the floral notes from the mix of herbs. Let’s not forget the…

View original post 443 more words

Posted in Uncategorized | Leave a comment

November 23, 2014 – Poblano Mac and Cheese

Tony’s making this for his holiday potluck lunch at work. He has a lot of very lucky co-workers.

kimtony123's avatarTwo at the Table

20141123_Poblano Mac and Cheese_IMG_8915_edited-1

We’ve been on a bit of an unplanned hiatus, what with us fighting off colds one week, taking a weekend getaway the next, and gearing up for Thanksgiving this week. So, we want to come back strong and share a relatively easy but super-delicious recipe: Poblano Mac and Cheese from Lisa Fain and “The Homesick Texan” cookbook. Kim usually makes this dish, but Tony wanted to learn how, so she coached him through it. Here’s how it all came together for us:

The first step, as always, was the prep work, which is really not too difficult, though it does take a little time. Tony grated the four cups of cheddar cheese and diced the four cloves of garlic. He also got the tasks of measuring out the butter, flour, milk, and spices (mustard powder, cayenne, and cumin), plus prepping the lime zest and cilantro.

Meanwhile, Kim worked on the chiles. She put them under the broiler for about five…

View original post 480 more words

Posted in Uncategorized | Leave a comment

November 30, 2014 – Acorn Squash Gnocchi

20141130_Acorn Squash Gnocchi_IMG_8927 copy

Last Sunday night, we were adventurous and made Acorn Squash Gnocchi, from the Girl in the Little Red Kitchen blog (www.girlinthelittleredkitchen.com). Tony describes how he did it.

First off, I have to be honest – this recipe took a very long time and was pretty labor intensive. I was prepared for that and planned around it, but start to finish (including roasting the veggies) this recipe took close to three hours. Part of that, of course, is that it was my first time making it, but I doubt I can cut much time off in the future. That said, it was totally worth the effort.

The first step, as I mentioned above, is to roast the squash and potatoes. The squash was done first, after about 45 minutes; the potatoes took 15 minutes more. This worked out well, because the 15 minutes was enough time for the squash to cool enough for me to handle. The recipe suggests running the squash through a ricer, but since we don’t have one and don’t have room for one, I followed the recipe’s Plan B and just scooped the squash into a bowl. As for the potatoes, I peeled them once they were cooled. I wasn’t sure I was doing this right, as I felt I was taking off a lot of potato (the drier, almost crispy part right under the skin) as I peeled. When I grated the potatoes using a box grater, I realized that the peeling sort of took care of itself: you can’t grate that dried layer easily, so whether you peel if off or not, it’s not making it into the gnocchi.

With the squash and potato in the bowl, I added the remaining ingredients: 1 cup of flour, 1 beaten egg, and 1 teaspoon of salt. I mixed everything together with a spoon and then started to knead the mixture. I quickly learned that it was still very, very wet and hard to work with. I added almost another cup of flour, bit by bit, until the dough was easier to handle. I rolled the dough out on a cutting board dusted with lots of flour, which I replaced as needed, into ropes about 1 1/2 inches thick and a little over foot long. I cut the ropes into pieces about one inch long, which I transferred to a large cookie sheet dusted with flour.

I had put a pot of salted water on to boil when I started cutting the gnocchi and it was ready to go when the gnocchi were prepared. I started putting the gnocchi into the boiling water a few at a time. I probably overloaded the pot with gnocchi (I added about a quarter of the total), but they cooked fine, floating up to the top after 3 minutes or so. I transferred the cooked gnocchi to a large bowl and added more until I had cooked half of them.

I next melted two tablespoons of butter in a large, non-stick frying pan and browned the gnocchi. The pan got pretty crowded, but I was determined to cook everything in two batches. After about 10 minutes over medium heat, the gnocchi had browned on both sides. I transferred half of what was in the pan to each of two plastic storage containers and sprinkled on some salt, pepper, sage, and lots of parmesan. (This was the lunch batch!) I repeated the entire process of boiling and browning with the remaining gnocchi and we sat down the dinner.

The gnocchi had cooked pretty much perfectly. While the squash gave them a consistency and flavor I wasn’t quite used to, they were both light and tasty. The browned sides gave them a little chewiness (the weren’t quite crunchy) and the butter sage sauce was a perfect complement. This recipe inspired me to make more tradition gnocchi next time – or at least to try to talk my Very Italian Mother into making them for us!

Posted in Uncategorized | 1 Comment

Menu for the Week of November 30, 2014

20141130_Acorn Squash GnocchiIMG_8926 copy

Two at the Table_Menu_Week of November 30, 2014

We have a busy week this week, with Kim and Tony getting together with friends, both alone and together, four nights this week. Not a lot of recipes to plan, especially with some delicious cassoulet left over from Thanksgiving, but we have a couple of new recipes we want to try.

We’ll make the first recipe, Acorn Squash Gnocchi, from the Girl in the Little Red Kitchen blog (www.girlinthelittleredkitchen.com), Sunday night. We still have an acorn squash from our recent visit to the farmers’ market in Hudson, NY and thought this would be a good way to use it. We’ve never made gnocchi before, so we thought this would be a good idea for Sunday, since we’ll have a little extra time to prep and cook. We’re also excited to try this recipe because it features a butter/sage sauce. We don’t often make sauces, and almost never make butter sauces for pasta, so this will be a fun experiment.

We’ve slated the second recipe, Roasted Salmon with Black Pepper and Ginger on Celery Root Puree, for Tuesday night. This recipe will allow us to use the celery root we bought at the farmers’ market and to try a new salmon recipe.

That’s it for this week. Pretty light on cooking, but we’ll be spending lots of time with good friends, so it should be a fun week. Also, Kim’s mom and dad sent us a dozen, Texas ruby-red grapefruit, so we’re looking for interesting ways to use them. Send us any suggestions you have and we’ll do our best to include them in our menu for next week!

Posted in Uncategorized | Leave a comment